0x00 参考
本笔记直接参考或引自如下链接文章:
https://www.w3cschool.cn/wkspring/
http://c.biancheng.net/spring/
0x01 Spring Bean装配
Bean的装配可以理解为依赖关系注入,Bean的装配方式也就是Bean的依赖注入方式。Spring容器支持多种形式的Bean的装配方式,如基于XML的Bean装配、基于Annotation的Bean装配和自动装配等。
0x02 基于XML装配Bean
Spring基于XML的装配通常采用两种实现方式,即setter方法注入(Setter Injection)和构造函数注入(Constructor Injection),这两种方式在前面也讲过。
在Spring实例化Bean的过程中,首先会调用默认的构造方法实例化Bean对象,然后通过Java的反射机制调用setXxx()方法进行属性的注入。因此,setter方法注入要求一个Bean的对应类必须满足以下两点要求:
- 必须提供一个默认的无参构造方法;
- 必须为需要注入的属性提供对应的setter方法;
使用setter方法注入时,在Spring配置文件中,需要使用<bean>元素的子元素<property>元素为每个属性注入值。而使用构造函数注入时,在配置文件中,主要使用<constructor-arg>标签定义构造方法的参数,可以使用其value属性(或子元素)设置该参数的值。
示例可参考前面的Spring DI文章:Spring基础篇之DI(依赖注入)
0x03 基于Annotation装配Bean
在Spring中,尽管使用XML配置文件可以实现Bean的装配工作,但如果应用中Bean的数量较多,会导致XML配置文件过于臃肿,从而给维护和升级带来一定的困难。
Java从JDK 5.0以后,提供了Annotation(注解)功能,Spring也提供了对Annotation技术的全面支持。Spring3中定义了一系列的Annotation(注解),常用的注解如下:
@Required
@Required注释应用于bean属性的setter方法,它表明受影响的bean属性在配置时必须放在XML配置文件中,否则容器就会抛出一个BeanInitializationException异常。
@Component
可以使用此注解描述Spring中的Bean,但它是一个泛化的概念,仅仅表示一个组件(Bean),并且可以作用在任何层次。使用时只需将该注解标注在相应类上即可。
@Repository
用于将数据访问层(DAO层)的类标识为Spring中的Bean,其功能与@Component 相同。
@Service
通常作用在业务层(Service 层),用于将业务层的类标识为Spring中的Bean,其功能与@Component相同。
@Controller
通常作用在控制层(如Struts2的Action),用于将控制层的类标识为Spring中的Bean,其功能与@Component相同。
@Autowired
用于对Bean的属性变量、属性的Set方法及构造函数进行标注,配合对应的注解处理器完成Bean的自动配置工作。默认按照Bean的类型进行装配。
@Resource
其作用与Autowired一样。其区别在于@Autowired默认按照Bean类型装配,而@Resource默认按照Bean实例名称进行装配。
@Resource中有两个重要属性:name 和 type。如果都不指定,则先按Bean实例名称装配,如果不能匹配,则再按照Bean类型进行装配;如果都无法匹配,则抛出NoSuchBeanDefinitionException异常。
@Qualifier
与@Autowired注解配合使用,会将默认的按Bean类型装配修改为按Bean的实例名称装配,Bean的实例名称由@Qualifier注解的参数指定。
@PostConstruct和@PreDestroy
为了定义一个bean的安装和卸载,我们使用 init-method 和 destroy-method 参数简单的声明一下 。init-method属性指定了一个方法,该方法在bean的实例化阶段会立即被调用。同样地,destroy-method指定了一个方法,该方法只在一个bean从容器中删除之前被调用。
作用和前面说到的Bean后置处理器一样,只不过换了注释的形式来实现。
@Configuration和@Bean
带有@Configuration的注解类表示这个类可以使用Spring IoC容器作为bean定义的来源。@Bean注解告诉Spring,一个带有@Bean的注解方法将返回一个对象,该对象应该被注册为在Spring应用程序上下文中的bean。
最简单可行的@Configuration类如下所示:
1
2
3
4
5
6
7
8
9
| package com.tutorialspoint;
import org.springframework.context.annotation.*;
@Configuration
public class HelloWorldConfig {
@Bean
public HelloWorld helloWorld(){
return new HelloWorld();
}
}
|
上面的代码将等同于下面的 XML 配置:
1
2
3
| <beans>
<bean id="helloWorld" class="com.mi1k7ea.HelloWorld" />
</beans>
|
在这里,带有@Bean注解的方法名称作为bean的ID,它创建并返回实际的bean。你的配置类可以声明多个@Bean。一旦定义了配置类,你就可以使用AnnotationConfigApplicationContext来加载并把它们提供给Spring容器,如下所示:
1
2
3
4
5
6
| public static void main(String[] args) {
ApplicationContext ctx = new AnnotationConfigApplicationContext(HelloWorldConfig.class);
HelloWorld helloWorld = ctx.getBean(HelloWorld.class);
helloWorld.setMessage("Hello World!");
helloWorld.getMessage();
}
|
你可以加载各种配置类,如下所示:
1
2
3
4
5
6
7
8
| public static void main(String[] args) {
AnnotationConfigApplicationContext ctx = new AnnotationConfigApplicationContext();
ctx.register(AppConfig.class, OtherConfig.class);
ctx.register(AdditionalConfig.class);
ctx.refresh();
MyService myService = ctx.getBean(MyService.class);
myService.doStuff();
}
|
Demo
PersonDao.java,DAO层即接口类:
1
2
3
4
5
| package com.mi1k7ea;
public interface PersonDao {
void add();
}
|
PersonDaoImpl.java,DAO层接口类的实现类,首先使用@Repository注解将PersonDaoImpl类标识为Spring中的Bean,其写法相当于配置文件中<bean id="personDao" class="com.mi1k7ea.PersonDaoImpl"/>的书写。然后在add()方法中输出一句话,用于验证是否成功调用了该方法:
1
2
3
4
5
6
7
8
9
10
11
| package com.mi1k7ea;
import org.springframework.stereotype.Repository;
@Repository("personDao")
public class PersonDaoImpl implements PersonDao {
@Override
public void add() {
System.out.println("Dao层的add()方法执行了...");
}
}
|
PersonService.java,Service层接口类:
1
2
3
4
5
| package com.mi1k7ea;
public interface PersonService {
void add();
}
|
PersonServiceImpl.java,Service层接口类的实现类, 首先使用@Service注解将PersonServiceImpl类标识为Spring中的Bean,其写法相当于配置文件中<bean id="personService" class="com.mi1k7ea.PersonServiceImpl"/>的书写。然后使用@Resource注解标注在属性personDao上(也可标注在personDao的setPersonDao()方法上),这相当于配置文件中<property name="personDao" ref="personDao"/>的写法。最后在该类的add()方法中调用personDao中的add()方法,并输出一句话 :
1
2
3
4
5
6
7
8
9
10
11
12
13
14
15
16
17
18
19
| package com.mi1k7ea;
import org.springframework.stereotype.Service;
import javax.annotation.Resource;
@Service("personService")
public class PersonServiceImpl implements PersonService {
@Resource(name = "personDao")
private PersonDao personDao;
public PersonDao getPersonDao() {
return personDao;
}
@Override
public void add() {
personDao.add();
System.out.println("Service层的add()方法执行了...");
}
}
|
PersonAction.java,首先使用@Controller注解标注PersonAction类,其写法相当于在配置文件中编写<bean id="personAction" class="com.mi1k7ea.PersonAction"/>。然后使用了@Resource注解标注在personService上,这相当于在配置文件内编写<property name="personService" ref="personService"/>。最后在其add()方法中调用了personService中的add()方法,并输出一句话 :
1
2
3
4
5
6
7
8
9
10
11
12
13
14
15
16
17
18
| package com.mi1k7ea;
import org.springframework.stereotype.Controller;
import javax.annotation.Resource;
@Controller("personAction")
public class PersonAction {
@Resource(name = "personService")
private PersonService personService;
public PersonService getPersonService() {
return personService;
}
public void add() {
personService.add();
System.out.println("Action层的add()方法执行了...");
}
}
|
MainApp.java:
1
2
3
4
5
6
7
8
9
10
11
12
13
14
15
| package com.mi1k7ea;
import org.springframework.context.ApplicationContext;
import org.springframework.context.support.ClassPathXmlApplicationContext;
public class MainApp {
public static void main(String[] args) {
ApplicationContext applicationContext = new ClassPathXmlApplicationContext("Beans.xml");
PersonAction personAction = (PersonAction) applicationContext.getBean("personAction");
personAction.add();
}
}
|
Beans.xml,使用context命名空间的component-scan元素进行注解的扫描,其base-package属性用于通知Spring所需要扫描的目录:
1
2
3
4
5
6
7
8
9
10
11
12
13
| ?xml version="1.0" encoding="UTF-8"?>
<beans xmlns="http://www.springframework.org/schema/beans"
xmlns:xsi="http://www.w3.org/2001/XMLSchema-instance"
xmlns:context="http://www.springframework.org/schema/context"
xsi:schemaLocation="http://www.springframework.org/schema/beans
http://www.springframework.org/schema/beans/spring-beans-3.0.xsd
http://www.springframework.org/schema/context
http://www.springframework.org/schema/context/spring-context.xsd">
<context:component-scan base-package="com.mi1k7ea"/>
</beans>
|
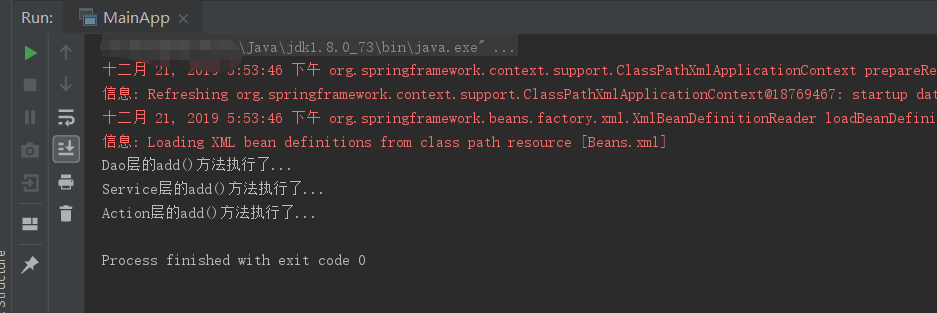
运行输出:
0x04 自动装配Bean
自动装配就是指Spring容器可以自动装配(autowire)相互协作的Bean之间的关联关系,将一个Bean注入其他Bean的Property中。
要使用自动装配,就需要配置<bean>元素的autowire属性。autowire 属性有以下五个值:
| 名称 |
说明 |
| byName |
根据 Property 的 name 自动装配,如果一个 Bean 的 name 和另一个 Bean 中的 Property 的 name 相同,则自动装配这个 Bean 到 Property 中。 |
| byType |
根据 Property 的数据类型(Type)自动装配,如果一个 Bean 的数据类型兼容另一个 Bean 中 Property 的数据类型,则自动装配。 |
| constructor |
根据构造方法的参数的数据类型,进行 byType 模式的自动装配。 |
| autodetect |
如果发现默认的构造方法,则用 constructor 模式,否则用 byType 模式。 |
| no |
默认情况下,不使用自动装配,Bean 依赖必须通过 ref 元素定义。 |
byName
这种模式由属性名称指定自动装配。Spring容器看作beans,在XML配置文件中beans的auto-wire属性设置为byName。然后,它尝试将它的属性与配置文件中定义为相同名称的beans进行匹配和连接。如果找到匹配项,它将注入这些beans,否则,它将抛出异常。
例如,在配置文件中,如果一个bean定义设置为自动装配byName,并且它包含spellChecker属性(即它有一个 setSpellChecker(…) 方法),那么Spring就会查找定义名为spellChecker的bean,并且用它来设置这个属性。你仍然可以使用<property>标签连接其余的属性。
Demo
SpellChecker.java不变。
TextEditor.java:
1
2
3
4
5
6
7
8
9
10
11
12
13
14
15
16
17
18
19
20
21
| package com.mi1k7ea;
public class TextEditor {
private SpellChecker spellChecker;
private String name;
public void setSpellChecker( SpellChecker spellChecker ){
this.spellChecker = spellChecker;
}
public SpellChecker getSpellChecker() {
return spellChecker;
}
public void setName(String name) {
this.name = name;
}
public String getName() {
return name;
}
public void spellCheck() {
spellChecker.checkSpelling();
}
}
|
MainApp.java:
1
2
3
4
5
6
7
8
9
10
11
12
| package com.mi1k7ea;
import org.springframework.context.ApplicationContext;
import org.springframework.context.support.ClassPathXmlApplicationContext;
public class MainApp {
public static void main(String[] args) {
ApplicationContext context = new ClassPathXmlApplicationContext("Beans.xml");
TextEditor te = (TextEditor) context.getBean("textEditor");
te.spellCheck();
}
}
|
Beans.xml,给textEditor这个Bean添加值为byName的autowire属性:
1
2
3
4
5
6
7
8
9
10
11
12
13
14
15
| <?xml version="1.0" encoding="UTF-8"?>
<beans xmlns="http://www.springframework.org/schema/beans"
xmlns:xsi="http://www.w3.org/2001/XMLSchema-instance"
xsi:schemaLocation="http://www.springframework.org/schema/beans
http://www.springframework.org/schema/beans/spring-beans-3.0.xsd">
<bean id="textEditor" class="com.mi1k7ea.TextEditor" autowire="byName">
<property name="name" value="mi1k7ea" />
</bean>
<bean id="spellChecker" class="com.mi1k7ea.SpellChecker" />
</beans>
|
这里我们对比下,不应用自动装配的Beans.xml,需要通过bean元素的子元素property的ref属性来设置装配:
1
2
3
4
5
6
7
8
9
10
11
12
13
14
15
16
| <?xml version="1.0" encoding="UTF-8"?>
<beans xmlns="http://www.springframework.org/schema/beans"
xmlns:xsi="http://www.w3.org/2001/XMLSchema-instance"
xsi:schemaLocation="http://www.springframework.org/schema/beans
http://www.springframework.org/schema/beans/spring-beans-3.0.xsd">
<bean id="textEditor" class="com.mi1k7ea.TextEditor">
<property name="spellChecker" ref="spellChecker" />
<property name="name" value="Generic Text Editor" />
</bean>
<bean id="spellChecker" class="com.mi1k7ea.SpellChecker" />
</beans>
|
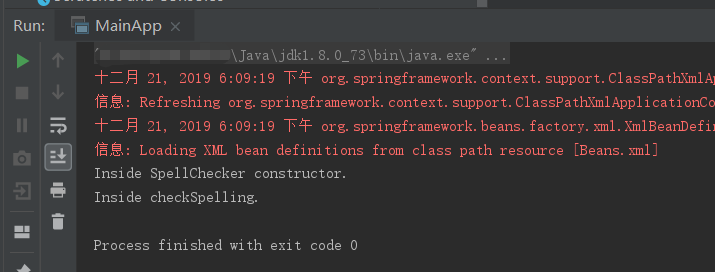
运行输出:
byType
这种模式由属性类型指定自动装配。Spring容器看作beans,在XML配置文件中beans的autowire属性设置为byType。然后,如果它的type恰好与配置文件中beans名称中的一个相匹配,它将尝试匹配和连接它的属性。如果找到匹配项,它将注入这些beans,否则,它将抛出异常。
例如,在配置文件中,如果一个bean定义设置为自动装配byType,并且它包含SpellChecker类型的spellChecker属性,那么Spring就会查找定义名为SpellChecker的bean,并且用它来设置这个属性。你仍然可以使用<property>标签连接其余属性。
Demo
MainApp.java,SpellChecker.java,TextEditor.java均不变。
Beans.xml,将autowire属性值改为byType:
1
2
3
4
5
6
7
8
9
10
11
12
13
14
15
| <?xml version="1.0" encoding="UTF-8"?>
<beans xmlns="http://www.springframework.org/schema/beans"
xmlns:xsi="http://www.w3.org/2001/XMLSchema-instance"
xsi:schemaLocation="http://www.springframework.org/schema/beans
http://www.springframework.org/schema/beans/spring-beans-3.0.xsd">
<bean id="textEditor" class="com.mi1k7ea.TextEditor" autowire="byType">
<property name="name" value="mi1k7ea" />
</bean>
<bean id="spellChecker" class="com.mi1k7ea.SpellChecker" />
</beans>
|
运行输出同上。
constructor
这种模式与byType非常相似,但它应用于构造器参数。Spring容器看作beans,在XML配置文件中beans的autowire属性设置为constructor。然后,它尝试把它的构造函数的参数与配置文件中beans名称中的一个进行匹配和连线。如果找到匹配项,它会注入这些bean,否则,它会抛出异常。
例如,在配置文件中,如果一个bean定义设置为通过构造函数自动装配,而且它有一个带有SpellChecker类型的参数之一的构造函数,那么Spring就会查找定义名为SpellChecker的bean,并用它来设置构造函数的参数。你仍然可以使用<constructor-arg>标签连接其余属性。
Demo
MainApp.java,SpellChecker.java均不变。
TextEditor.java,添加一个有参构造函数:
1
2
3
4
5
6
7
8
9
10
11
12
13
14
15
16
17
18
19
| package com.mi1k7ea;
public class TextEditor {
private SpellChecker spellChecker;
private String name;
public TextEditor( SpellChecker spellChecker, String name ) {
this.spellChecker = spellChecker;
this.name = name;
}
public SpellChecker getSpellChecker() {
return spellChecker;
}
public String getName() {
return name;
}
public void spellCheck() {
spellChecker.checkSpelling();
}
}
|
Beans.xml,将autowire属性值改为constructor,其中另一个参数name通过constructor-arg子元素即构造函数的形式进行装配:
1
2
3
4
5
6
7
8
9
10
11
12
13
14
15
| <?xml version="1.0" encoding="UTF-8"?>
<beans xmlns="http://www.springframework.org/schema/beans"
xmlns:xsi="http://www.w3.org/2001/XMLSchema-instance"
xsi:schemaLocation="http://www.springframework.org/schema/beans
http://www.springframework.org/schema/beans/spring-beans-3.0.xsd">
<bean id="textEditor" class="com.mi1k7ea.TextEditor" autowire="constructor">
<constructor-arg value="Generic Text Editor"/>
</bean>
<bean id="SpellChecker" class="com.mi1k7ea.SpellChecker" />
</beans>
|
运行输出同上。
TextEditor.java均不变。